Caddy: Modern web server and reverse proxy for VPS and Docker in 2026
TL;DR
- Automatic HTTPS "out of the box": Caddy automatically obtains and renews SSL/TLS certificates from Let's Encrypt or other ACME providers, significantly simplifying the deployment of secure websites.
- Configuration simplicity: The intuitive Caddyfile allows configuring a complex stack with a single line or several declarative blocks, minimizing deployment and maintenance time.
- Support for HTTP/3 and modern protocols: Caddy is a pioneer in supporting HTTP/3 (QUIC), TLS 1.3, and other advanced web technologies, ensuring high performance and security.
- Ideal for microservices and Docker: Thanks to its lightweight nature, API for dynamic configuration, and excellent integration with Docker and Kubernetes, Caddy acts as a powerful reverse proxy and API gateway.
- High performance and reliability: Written in Go, Caddy demonstrates impressive performance and stability even under high loads, while consuming minimal resources.
- Universal solution: Suitable for static sites, web applications (Python, Node.js, Go, PHP), APIs, load balancing, and access management, replacing several tools.
- Time and resource savings: Automation of routine certificate management tasks and simple configuration syntax reduce operational costs and increase the productivity of DevOps teams.
Looking for a server that just works?
Valebyte VPS — NVMe, 24/7 support, deploy in 60 seconds.
Introduction: Why Caddy is your choice in 2026
In the rapidly evolving world of web technologies in 2026, where security, performance, and ease of deployment have become not just desirable, but absolutely essential requirements, choosing the right web server and reverse proxy plays a critical role. Traditional solutions like Nginx and Apache have dominated the market for decades, but their configuration, especially regarding SSL/TLS certificate management, often requires significant effort and deep knowledge. This is where Caddy comes into play – a modern, powerful, and surprisingly easy-to-use web server that fundamentally changes the game.
Caddy, written in Go, was developed from the outset with modern realities in mind: automation, containerization, HTTP/3, and "out-of-the-box" security. It eliminates the headache associated with manually obtaining and renewing SSL certificates, making HTTPS a standard rather than an option requiring additional configuration. It's not just a web server; it's an intelligent gateway that can serve as a reverse proxy, load balancer, file server, and even a static site server, all with minimal configuration.
This article is addressed to a wide range of technical specialists: from DevOps engineers looking for ways to optimize their CI/CD pipelines and simplify infrastructure management, to Backend developers wishing to quickly and reliably deploy their applications in Python, Node.js, Go, or PHP. SaaS project founders and startup CTOs will find practical recommendations here for reducing operational costs and enhancing the security of their platforms. System administrators will appreciate the ease of maintenance and powerful automation capabilities. We will consider Caddy not only as a technology but also as a strategic tool that will help your team focus on product development rather than struggling with infrastructure.
In 2026, as security threats become more sophisticated and users expect instant content loading, Caddy offers an elegant solution that meets these challenges. It natively supports HTTP/3, TLS 1.3, and other advanced protocols, ensuring maximum performance and data protection. Its integration with Docker and Kubernetes makes it an ideal choice for cloud and microservice architectures, allowing applications with automatic HTTPS to be deployed in minutes. We will delve into the details of its operation, examine practical examples, common mistakes, and economic benefits, so you can make an informed decision about implementing Caddy in your stack.
Key criteria for choosing a web server and reverse proxy
Choosing the right web server or reverse proxy is not just a technical decision; it's a strategic step that impacts the security, performance, scalability, and operational costs of your project. In 2026, as infrastructure requirements continuously grow, it's important to consider a number of key criteria. Let's examine each of them in detail, explaining its importance and evaluation methods.
1. HTTPS Automation and Certificate Management
Why it's important: In 2026, HTTPS is the de facto standard for any web resource. Search engines downgrade sites without SSL, browsers warn users about insecure connections, and data protection legislation (GDPR, CCPA) requires traffic encryption. Manually obtaining, installing, and regularly renewing certificates from Let's Encrypt or other ACME providers is a laborious and error-prone process. Automating this process is critically important for reducing operational costs and ensuring continuous security.
How to evaluate: Look for solutions that integrate an ACME client directly into the core, automatically handling all stages – from domain validation to certificate renewal. The ability to use various ACME providers (Let's Encrypt, ZeroSSL) and support for wildcard certificates will be a big plus. Evaluate how many lines of configuration or commands are required to enable HTTPS. The fewer, the better.
2. Configuration and Maintenance Simplicity
Why it's important: Complex and verbose configuration increases the likelihood of errors, slows down deployment, and complicates maintenance. In a DevOps environment, where speed and repeatability of operations are paramount, a declarative and intuitive configuration syntax allows teams to implement changes faster and lowers the entry barrier for new engineers.
How to evaluate: Compare the volume and complexity of configuration files for typical tasks (e.g., static site, reverse proxy for a single application, load balancing). Evaluate the presence of built-in syntax checking and formatting mechanisms. The availability of clear documentation and an active community is also an indicator of ease of maintenance.
3. Performance and Support for Modern Protocols
Why it's important: Website loading speed directly impacts user experience, conversion, and SEO. Support for modern protocols such as HTTP/3 (QUIC), TLS 1.3, and Brotli compression significantly enhances connection performance and security. HTTP/3, in particular, reduces latency and improves data transmission reliability, which is especially relevant for mobile users and high-latency networks.
How to evaluate: Check for built-in support for HTTP/3 and TLS 1.3 without the need for additional modules or complex configuration. Evaluate caching capabilities, compression (gzip, Brotli), and request multiplexing. Look for performance benchmarks for various load scenarios and compare resource consumption (CPU, RAM).
4. "Out-of-the-Box" Security
Why it's important: The web server is the first line of defense for your application. Vulnerabilities in it can lead to data compromise, DoS attacks, and other serious consequences. The solution should have robust default security settings, minimizing the need for manual configuration and reducing the risk of human error.
How to evaluate: Look for automatic support for TLS 1.3, HSTS (HTTP Strict Transport Security), and sane defaults for ciphers. Evaluate built-in mechanisms for protection against common attacks (e.g., rate limiting, blocking malicious requests). Check how actively the project responds to discovered vulnerabilities and releases security updates.
5. Containerization and Cloud Environment Support
Why it's important: In 2026, Docker, Kubernetes, and cloud platforms are the standard for application deployment. A web server should be easily integrable into these ecosystems, offering a minimal image size, fast startup, dynamic configuration via API, and good support in orchestrators.
How to evaluate: Check for official Docker images, their size, and update frequency. Evaluate how easily configuration can be integrated into Docker Compose or Kubernetes Ingress/Service. The presence of an API for dynamic configuration management without restarting the process is a key advantage for cloud environments.
6. Flexibility and Extensibility
Why it's important: Every project is unique, and requirements can change. A web server must be flexible enough to adapt to various use cases – from a simple static site to a complex API gateway with load balancing and authorization. The ability to extend functionality through plugins or modules avoids vendor lock-in and allows adaptation to specific needs.
How to evaluate: Explore available plugins or modules for tasks such as authentication, caching, logging, and integration with external services. Evaluate how easy it is to create custom extensions if needed. Check if the solution supports various application backends (FastCGI, SCGI, reverse proxy) and protocols.
7. Community and Documentation
Why it's important: An active community and quality documentation are your insurance against getting stuck during development and operation. The ability to quickly find answers to questions, configuration examples, and get help from other users or project developers significantly reduces problem-solving time.
How to evaluate: Look at activity on GitHub, forums, Stack Overflow. Evaluate the quality of the official documentation: its completeness, relevance, presence of examples and guides. Check how often new versions are released and how promptly bugs are fixed.
8. Total Cost of Ownership (TCO)
Why it's important: TCO includes not only direct licensing costs (if any) but also indirect ones: engineer time for setup and maintenance, risks of downtime due to errors, and personnel training costs. A solution that simplifies operation and automates routine tasks ultimately proves more cost-effective, even if its direct cost is higher.
How to evaluate: Compare the time required to deploy and configure a typical project with each solution. Estimate how many hours per month will be spent on maintenance (certificate renewal, security patches, monitoring). Note that open-source solutions like Caddy do not have direct licensing fees but require investment in training and support.
Comparative Table: Caddy vs. Competitors
To make an informed decision, it's important to understand how Caddy is positioned relative to other popular web servers and reverse proxies. In this table, we compare Caddy with its main competitors – Nginx, Apache, Traefik, and Envoy – across key criteria relevant for 2026. The data reflects current capabilities and trends.
| Criterion | Caddy | Nginx (Open Source) | Apache HTTP Server | Traefik | Envoy Proxy |
|---|---|---|---|---|---|
| Automatic HTTPS (ACME) | Built-in, fully automatic (Let's Encrypt, ZeroSSL). | Via external scripts (Certbot) or plugins. | Via external scripts (Certbot) or modules (mod_md). | Built-in, automatic, dynamic. | None, only TLS traffic proxying. |
| HTTP/3 (QUIC) Support | Built-in, active by default. | Available in Nginx 1.25+, requires building with QUIC. | Experimental support via mod_http3. | Built-in, active since version 2.x. | QUIC support in active development. |
| Configuration Complexity | Very low (Caddyfile), declarative, intuitive. | Medium/High, imperative, verbose. | High, XML-like, verbose, .htaccess. | Low/Medium (YAML/TOML), declarative, dynamic. | Very high (JSON/YAML), complex, powerful. |
| Docker/K8s Integration | Excellent, lightweight images, API for dynamism. | Good, but configuration is static or requires reload. | Medium, larger images, less dynamic. | Excellent, built for K8s, dynamic configuration. | Excellent, but requires a controller (Istio/Ambassador). |
| Performance (2026) | High, efficient use of Go resources. | Very high, optimized C-code. | Medium/High, depends on modules and configuration. | High, Go-oriented. | Very high, C++-oriented. |
| Dynamic Configuration (API) | Built-in REST API for runtime changes without restart. | Only via external tools or reload. | Only via reload. | Built-in API, Watchers for K8s/Docker. | Built-in xDS API, powerful dynamism. |
| Extensibility (plugins/modules) | Good, modular Go architecture. | Excellent, rich C module ecosystem. | Excellent, vast number of modules. | Good, but less flexible than Nginx/Apache. | Very good, filters, WebAssembly. |
| Primary Development Language | Go | C | C | Go | C++ |
| Price (licenses/support) | Free (Open Source), commercial support from authors. | Free (Open Source), Nginx Plus (commercial). | Free (Open Source), commercial support from vendors. | Free (Open Source), Traefik Enterprise (commercial). | Free (Open Source), commercial support from vendors. |
Key Takeaways from the Comparison:
Caddy stands out for its unparalleled simplicity and automation, especially regarding HTTPS. It is ideal for those who want to quickly deploy modern web applications with minimal effort and get HTTP/3 "out of the box". Its dynamic configuration and lightweight nature make it an excellent choice for containerized environments and microservices, especially when Nginx Plus or Traefik Enterprise don't fit the budget.
Nginx remains the king of performance and flexibility for static configurations and high-load systems where every millisecond counts, and engineers are well-versed in its syntax. However, its HTTPS automation requires external tools, and dynamic configuration without a restart is only available in the commercial version.
Apache HTTP Server is a veteran offering immense flexibility and a wealth of modules, but its configuration is often complex and verbose, and its performance can lag behind Nginx and Caddy in certain scenarios. It remains popular for traditional LAMP stacks and hosting.
Traefik is a direct competitor to Caddy in the world of dynamic proxies for Docker and Kubernetes. It also offers automatic HTTPS and dynamic configuration. The main difference is that Traefik is inherently more focused on service discovery, while Caddy is more versatile as a web server and has a simpler Caddyfile for basic tasks.
Envoy Proxy is a high-performance, programmable proxy service designed for cloud-native applications and service mesh. It is incredibly powerful and flexible, but its configuration is extremely complex and typically requires the use of a controller (e.g., Istio) for management. This solution is for very large and complex distributed systems, not for a typical VPS or small/medium SaaS.
Overall, for most DevOps engineers, Backend developers, and SaaS project founders who value simplicity, security, and deployment speed, Caddy offers the most balanced and modern solution. It allows focusing on product development rather than battling with infrastructure.
Looking for a server that just works?
Valebyte VPS — NVMe, 24/7 support, deploy in 60 seconds.
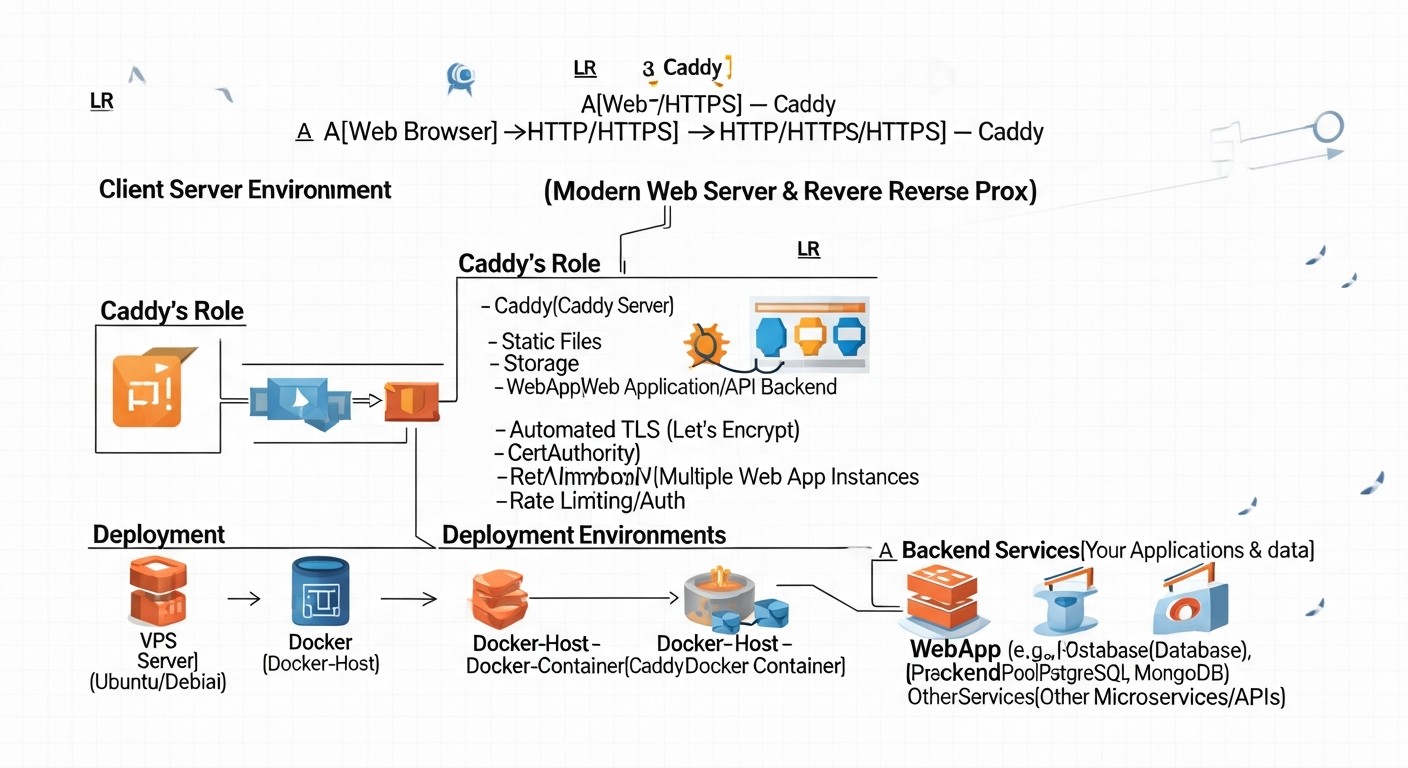
Detailed Overview of Caddy's Key Features
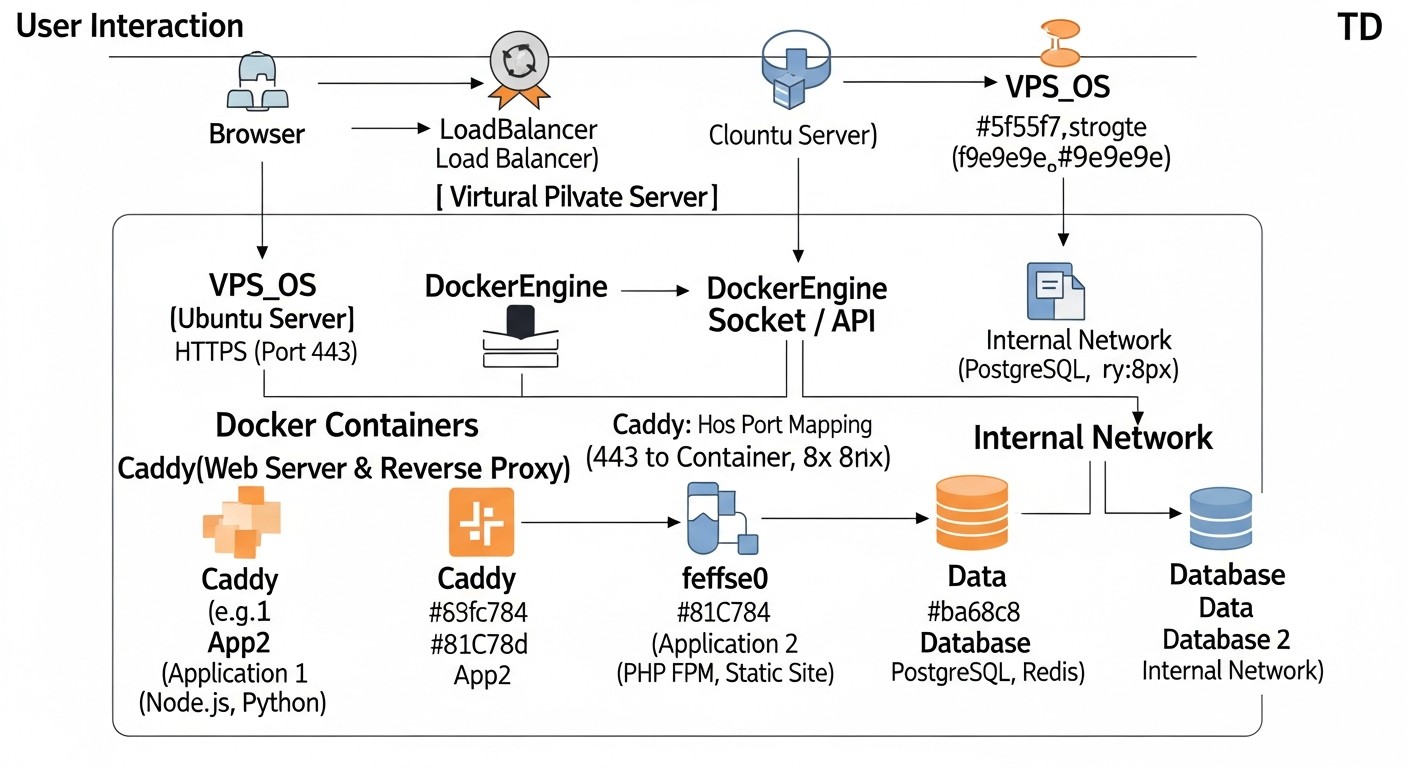
Caddy is not just another web server; it's a holistic platform designed to simplify web infrastructure. Its architecture and feature set allow it to function simultaneously as a static file server, reverse proxy, load balancer, and API gateway. Let's delve into its key capabilities that make it so appealing in 2026.
1. Automatic HTTPS "Out of the Box"
One of Caddy's most revolutionary features is its built-in, fully automated HTTPS management system. Caddy was the first web server to make automatic HTTPS its standard. This means that when Caddy is first launched for a new domain, it independently:
- Identifies the domain for which a certificate is required.
- Uses the ACME (Automated Certificate Management Environment) protocol to communicate with a Certificate Authority (Let's Encrypt by default).
- Performs domain ownership verification (typically HTTP-01 or DNS-01).
- Obtains and installs the TLS certificate.
- Configures the server to use this certificate.
- Automatically renews the certificate before its expiration, eliminating the need for Cron jobs or manual intervention.
Pros:
- Unrivaled Simplicity: To enable HTTPS, simply specify the domain name in the configuration. No manual Certbot commands, no Cron jobs.
- Enhanced Security: Always up-to-date certificates and the use of modern TLS protocols (TLS 1.3 by default).
- Time Savings: Engineers are freed from the routine and error-prone task of certificate management.
- Wildcard Certificate Support: With the help of DNS providers, Caddy can obtain and manage wildcard certificates (.example.com).
Cons:
- Requires access to ports 80 and 443 for HTTP-01 verification. For DNS-01, access to the DNS provider's API is needed.
- In case of misconfiguration or DNS issues, automation may temporarily fail.
Who it's for: Everyone! From individual developers deploying personal projects to large SaaS companies needing a reliable and automated SSL management system for thousands of domains. This is especially valuable for microservice architectures where each service might have its own domain or subdomain.
2. Caddyfile: Declarative and Intuitive Configuration
Caddyfile is a high-level, human-readable configuration language that is one of Caddy's hallmarks. Unlike the imperative, often verbose configurations of Nginx or Apache, Caddyfile uses a declarative approach, allowing you to describe the desired server state with minimal code. It's so simple that even a novice can set up a working web server with HTTPS in minutes.
Caddyfile example for a static site:
example.com {
    root  /var/www/html
    file_server
}
This simple configuration does two things: serves files from /var/www/html for the domain example.com and automatically configures HTTPS for it.
Pros:
- Simplicity and Readability: Easy to understand what each configuration block does.
- Rapid Deployment: Minimal lines of code for complex tasks.
- Fewer Errors: Declarative syntax reduces the likelihood of typos and logical errors.
- Modularity: Supports importing other Caddyfiles, which is convenient for large projects.
Cons:
- For very complex, low-level settings, using JSON configuration might be required, which is more powerful but less readable.
- Some engineers accustomed to Nginx may need time to adjust their mindset.
Who it's for: Everyone who values speed and simplicity. Especially useful for startups where every engineer's hour counts, and for DevOps teams looking to reduce time spent on infrastructure deployment and maintenance.
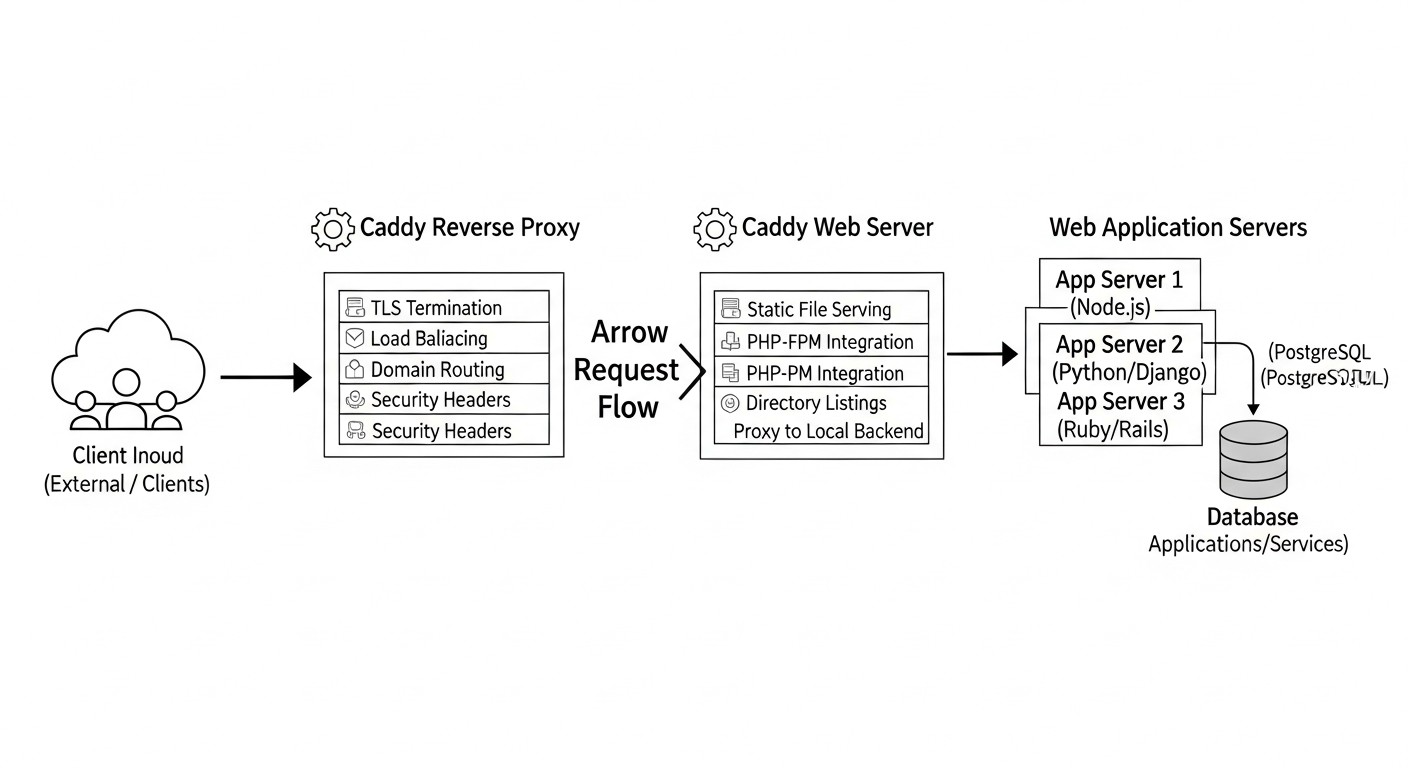
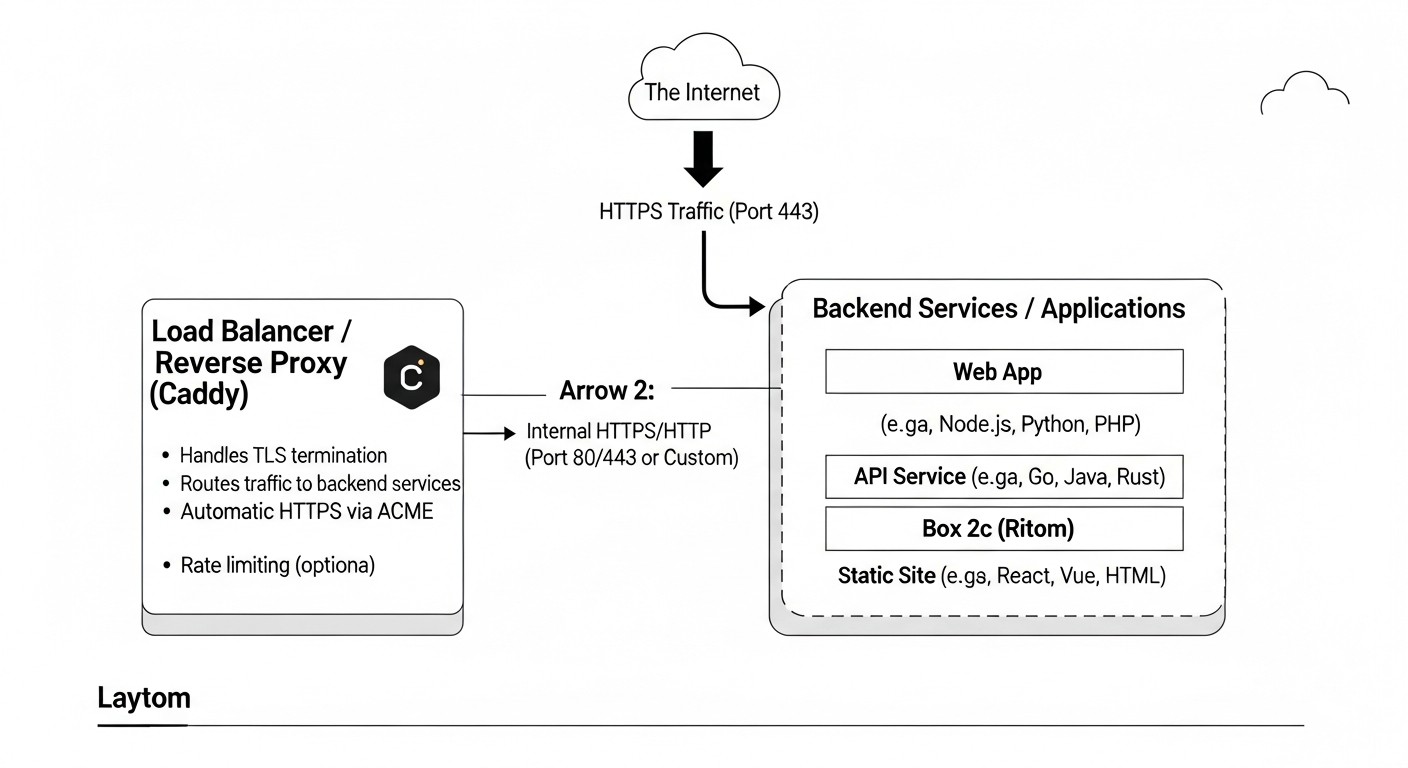
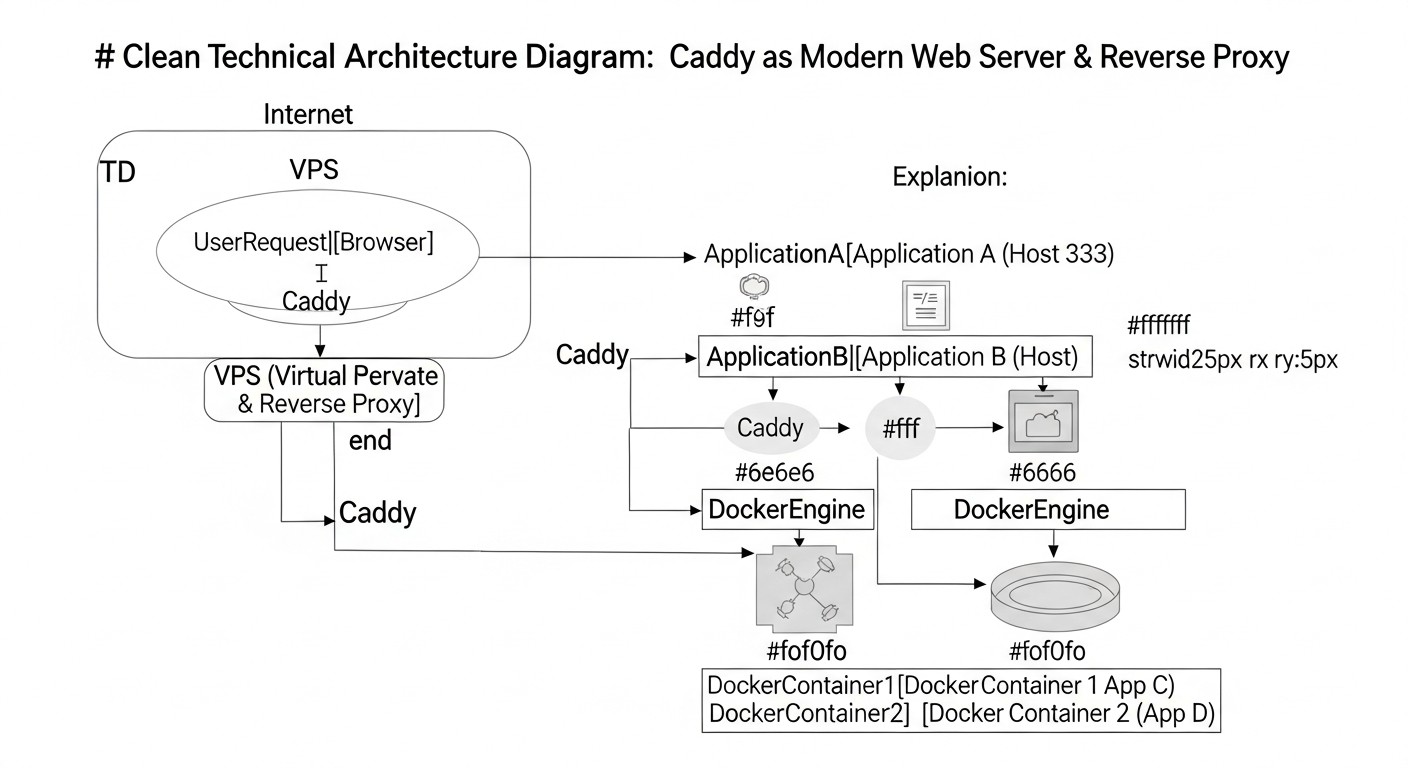
3. Powerful Reverse Proxy and Load Balancing Capabilities
Caddy excels as a reverse proxy, directing incoming requests to one or more backend services. This makes it an ideal choice for microservice architectures, API gateways, and web applications. It supports various load balancing strategies and can work with dynamically changing backends.
Caddyfile example for a reverse proxy with load balancing:
api.example.com {
    reverse_proxy /api/ backend_service_1:8080 backend_service_2:8080 {
        lb_policy round_robin
        health_uri /health
        health_interval 5s
    }
}
Pros:
- Simple Configuration: A few lines for a full-fledged reverse proxy with load balancing.
- HTTP/2 and HTTP/3 Support: Caddy can proxy requests using modern protocols on both the client and server sides.
- Various Load Balancing Strategies: Round Robin, Least Connections, Random, IP Hash.
- Health Checks: Automatic removal of unhealthy backends from the pool.
- WebSocket and HTTP/2 Push: Full support for modern protocols.
Cons:
- For very complex routing and request transformation scenarios, more detailed JSON configuration or writing custom plugins might be required.
Who it's for: Backend developers who need a simple way to deploy their APIs and microservices. DevOps engineers managing Docker/Kubernetes clusters, where Caddy can serve as an Ingress controller or Sidecar proxy.
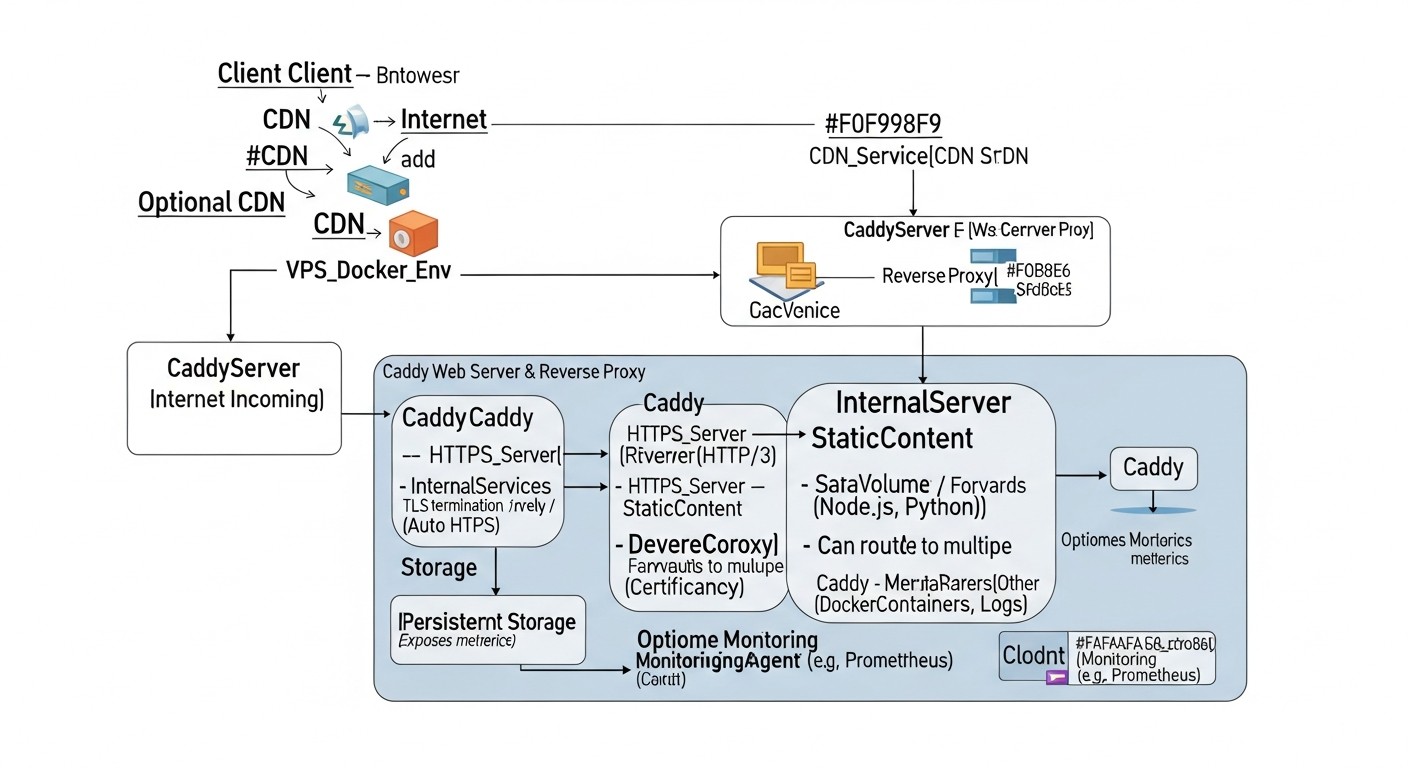
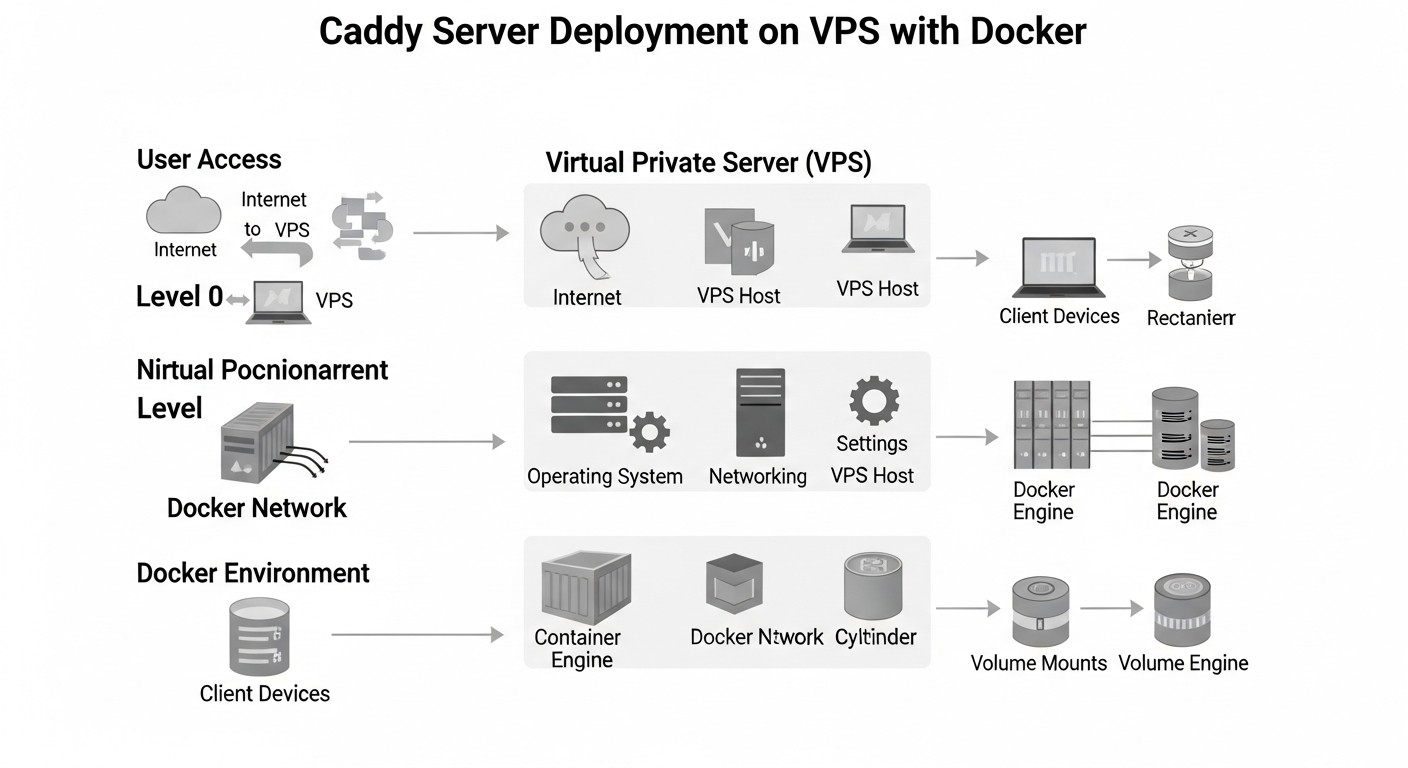
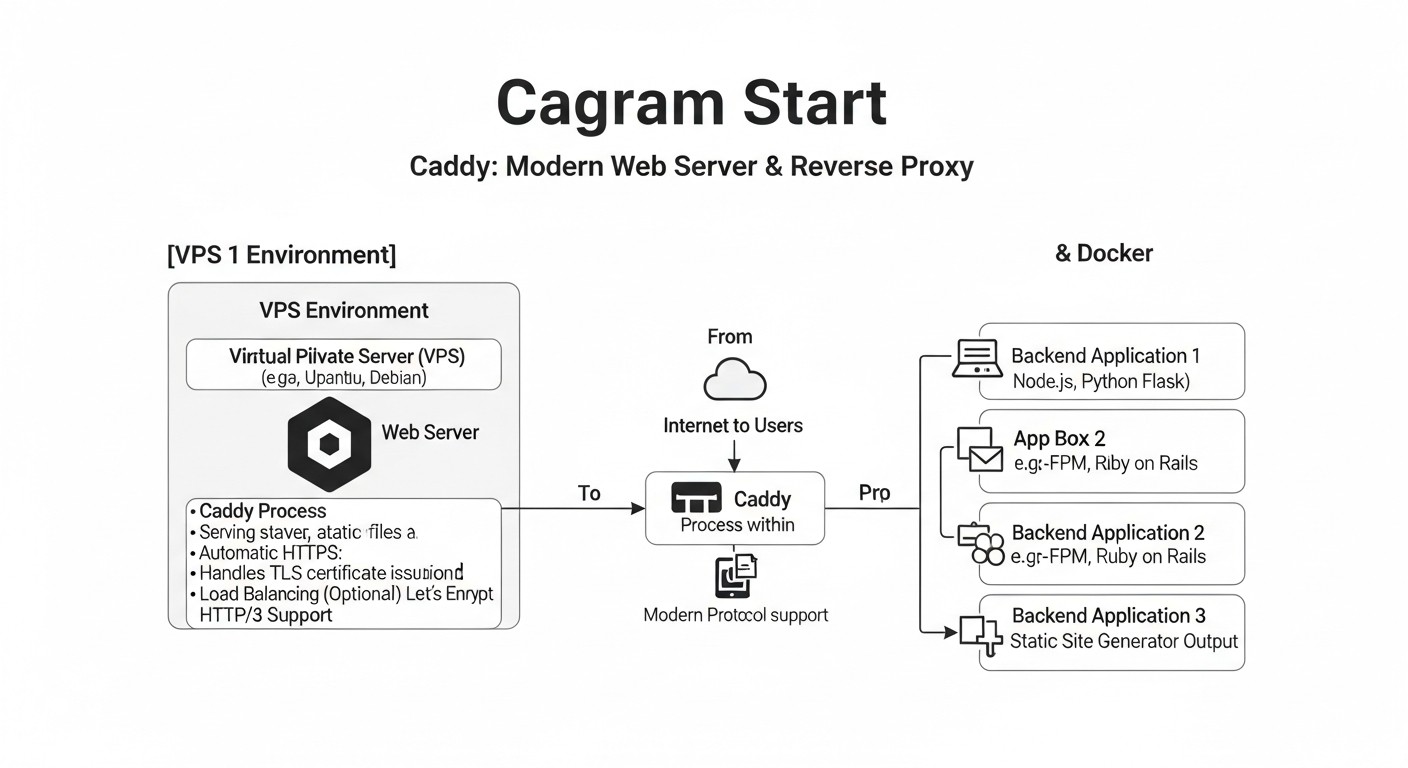
4. Seamless Integration with Docker and Kubernetes
Caddy, written in Go, possesses all the advantages of the language for containerized environments: minimal binary size, high performance, low resource consumption, and no external dependencies. This makes it ideal for use in Docker containers and Kubernetes clusters.
Pros:
- Lightweight Docker Images: Official Caddy images are very compact, which speeds up downloads and deployments.
- Fast Startup: Caddy starts almost instantly, which is critical for scaling in cloud environments.
- Dynamic Configuration: Caddy's API allows configuration to be changed "on the fly" without restarting the container, which is ideal for Service Discovery in Kubernetes.
- Convenience in Docker Compose: Easy integration of Caddyfile into Docker Compose.
Cons:
- For fully dynamic service discovery in Kubernetes, additional logic or plugins might be required, although the Caddy API makes it quite simple to implement.
Who it's for: DevOps engineers and system administrators actively using Docker and Kubernetes. Caddy can serve as an Ingress controller, Sidecar proxy for individual services, or an API Gateway for the entire cluster.
5. HTTP/3 (QUIC) and TLS 1.3 Support
Caddy is a pioneer in supporting the most modern web protocols. It was one of the first web servers to offer full support for HTTP/3 (based on QUIC) and TLS 1.3 "out of the box" and by default. This significantly improves the performance and security of web applications.
HTTP/3 (QUIC): This protocol, operating over UDP, solves many issues of HTTP/2 and TCP, such as "head-of-line blocking" and slow connection startup. It provides faster page loading, especially in unstable network conditions or high latency, which is critical for mobile users.
TLS 1.3: The latest version of the security protocol, offering improved performance (reduced number of "handshakes") and enhanced cryptography. Caddy uses TLS 1.3 by default, ensuring the maximum level of protection.
Pros:
- Maximum Performance: Reduced latency and accelerated content loading.
- Improved Security: Use of the latest encryption standards.
- Competitive Advantage: Your users get a better experience, and search engines value modern technologies.
- Ease of Activation: In Caddy, these features are active by default and require no additional configuration.
Cons:
- Some older clients or network devices may not support HTTP/3, but Caddy automatically falls back to HTTP/2 or HTTP/1.1.
Who it's for: Any project aiming for maximum performance and security. Especially important for SaaS projects, media platforms, mobile applications, and anyone working with a global audience.
Collectively, these capabilities make Caddy an extremely powerful, flexible, and easy-to-use tool capable of meeting the most stringent requirements of modern web infrastructure.
Practical Tips and Recommendations for Working with Caddy
Implementing a new tool into your infrastructure always requires practical knowledge. Here, we have compiled step-by-step instructions, typical configurations, and tips based on real-world experience to help you quickly and effectively get started with Caddy on a VPS or in Docker.
1. Caddy Installation
On a VPS (Linux):
The most reliable way to install Caddy on Linux is to use the official repository. This ensures timely updates and correct configuration of system services.
# 1. Установить необходимые пакеты
sudo apt install -y debian-keyring debian-archive-keyring apt-transport-https

# 2. Добавить ключ GPG Caddy
curl -1sLf 'https://dl.cloudsmith.io/public/caddy/stable/gpg.key' | sudo gpg --dearmor -o /usr/share/keyrings/caddy-stable-archive-keyring.gpg

# 3. Добавить репозиторий Caddy
curl -1sLf 'https://dl.cloudsmith.io/public/caddy/stable/debian.deb.txt' | sudo tee /etc/apt/sources.list.d/caddy-stable.list

# 4. Обновить список пакетов и установить Caddy
sudo apt update
sudo apt install caddy
After installation, Caddy will be launched as a system service (systemd), and its configuration file will be located at /etc/caddy/Caddyfile, with the default root directory for static files being /usr/share/caddy.
In Docker:
Using Caddy in Docker is the most common and recommended scenario, especially for microservices. Official Caddy images are available on Docker Hub.
# Запуск Caddy для обслуживания статических файлов из текущей директории
docker run -p 80:80 -p 443:443 \
  -v $PWD/Caddyfile:/etc/caddy/Caddyfile \
  -v $PWD/html:/srv \
  -v caddy_data:/data \
  caddy/caddy:latest
Here:
-p 80:80 -p 443:443: We map HTTP and HTTPS ports.-v $PWD/Caddyfile:/etc/caddy/Caddyfile: We mount your Caddyfile.-v $PWD/html:/srv: We mount the directory with static files.-v caddy_data:/data: We mount a named volume for storing certificates and other Caddy data. This is critically important for preserving certificates when restarting the container.
2. Basic Caddyfile Configuration for a Static Site
This is the simplest and most frequently used scenario. Suppose you have the domain mysite.com, and you want to host static HTML files from the directory /var/www/mysite.
# Caddyfile: /etc/caddy/Caddyfile
mysite.com {
    # Specify the root directory for files
    root  /var/www/mysite
    # Enable the static file server
    file_server
    # Enable Gzip or Brotli compression
    encode gzip brotli
    # Set security headers
    header {
        Strict-Transport-Security "max-age=31536000; includeSubDomains; preload"
        X-Content-Type-Options "nosniff"
        X-Frame-Options "DENY"
        Referrer-Policy "strict-origin-when-cross-origin"
    }
    # Access logging
    log {
        output file /var/log/caddy/access.log {
            roll_size 10mb
            roll_keep 5
        }
        format json
    }
}
After saving the file, restart Caddy: sudo systemctl reload caddy (for VPS) or restart the Docker container.
3. Caddy as a Reverse Proxy for a Web Application
Suppose your Node.js or Python application is listening on port 3000 on the same server.
# Caddyfile: /etc/caddy/Caddyfile
app.mysite.com {
    # Proxy all requests to local port 3000
    reverse_proxy localhost:3000
    # Enable logging
    log {
        output file /var/log/caddy/app_access.log
    }
}
For Docker containers where Caddy and your application are in the same Docker Compose network:
# Caddyfile: /etc/caddy/Caddyfile
app.mysite.com {
    # 'backend_service' is the name of your service in Docker Compose
    reverse_proxy backend_service:3000
}
4. Configuring Multiple Domains and Subdomains
Caddyfile is very flexible when working with multiple domains. Simply add a new block for each domain:
# Main site
mysite.com {
    root  /var/www/mysite
    file_server
    encode gzip brotli
}

# Blog on a subdomain
blog.mysite.com {
    root  /var/www/blog
    file_server
    encode gzip brotli
    # Additional headers, if needed
}

# API service
api.mysite.com {
    reverse_proxy localhost:8080
    # CORS configuration for API
    header {
        Access-Control-Allow-Origin ""
        Access-Control-Allow-Methods "GET, POST, OPTIONS"
        Access-Control-Allow-Headers "Content-Type, Authorization"
    }
}
5. Using Caddy with Docker Compose
This is a powerful pattern for local development and production deployment. Create a docker-compose.yml:
version: '3.8'

services:
  caddy:
    image: caddy/caddy:latest
    restart: unless-stopped
    ports:
      - "80:80"
      - "443:443"
    volumes:
      - ./Caddyfile:/etc/caddy/Caddyfile:ro
      - ./public:/srv:ro # Directory for static files
      - caddy_data:/data # For certificates
    networks:
      - app_network

  backend:
    image: my-backend-app:latest # Your backend image
    restart: unless-stopped
    environment:
      - PORT=8000
    networks:
      - app_network

volumes:
  caddy_data:

networks:
  app_network:
    external: true # Or internal, if the network is only for compose
Your Caddyfile for this scenario:
# Caddyfile
my-app.com {
    # Serving static files from /srv
    root  /srv
    file_server

    # Proxying API requests to the backend service
    handle /api/ {
        reverse_proxy backend:8000
    }
}
Run: docker-compose up -d. Caddy will automatically obtain certificates for my-app.com and will proxy requests to backend.
6. Caddy Log Configuration
Good logs are critically important for debugging and monitoring. Caddy supports various log formats and output locations.
# Global log settings (apply to all sites unless overridden)
{
    log {
        output file /var/log/caddy/caddy.log {
            roll_size 100mb
            roll_keep 10
            roll_zip true
        }
        format json # Or console, common_log
        level INFO # DEBUG, INFO, WARN, ERROR, FATAL
    }
}

# Logs for a specific site
mysite.com {
    log {
        output file /var/log/caddy/mysite_access.log {
            roll_size 50mb
        }
        format json {
            # Additional fields in the JSON log
            fields {
                request>headers>User-Agent delete
                resp_headers>Set-Cookie delete
            }
        }
    }
    # ... rest of the site configuration
}
It is recommended to use the JSON format for access logs, as it is easily parsed by centralized logging systems (ELK Stack, Grafana Loki).
7. Using Caddy for HTTP Redirects
Caddy simplifies the configuration of redirects, for example, from www to non-www or from HTTP to HTTPS (although Caddy does this automatically by default).
# Redirect from www to non-www
www.example.com {
    redir https://example.com{uri} permanent
}

# Main site
example.com {
    root  /var/www/example
    file_server
}

# Redirect old URL to new
old-page.com {
    redir https://new-site.com/new-path{uri} permanent
}
Caddy redirects HTTP traffic to HTTPS by default, so an explicit redir for this is usually not required if you simply specify the domain name.
8. Managing Caddy as a System Service
After installation via a package manager, Caddy is usually managed via systemd:
sudo systemctl start caddy: Start Caddy.sudo systemctl stop caddy: Stop Caddy.sudo systemctl restart caddy: Restart Caddy.sudo systemctl reload caddy: Apply configuration changes without fully stopping the service (recommended).sudo systemctl status caddy: Check Caddy status.sudo journalctl -u caddy --since "1 hour ago": View Caddy logs.
These practical tips will help you quickly master Caddy and effectively use it in your projects, whether on a VPS or in containerized environments.
Common Mistakes When Using Caddy and How to Avoid Them
Despite Caddy's simplicity, like any powerful tool, it has its nuances. Experience shows that some mistakes are more common than others. Knowing these pitfalls will help you avoid hours of debugging and ensure the stable operation of your infrastructure.
1. Incorrect File and Directory Permissions
Error: Caddy cannot read the Caddyfile, certificates, or served static files because the user it's running under (usually caddy or www-data) does not have the necessary permissions.
Consequences: 500/403 errors when accessing the site, inability to start Caddy, lack of automatic HTTPS.
How to avoid:
- Ensure that the
caddyuser (or the corresponding user in your system) has read permissions for the Caddyfile, site root directories, and the directory where Caddy stores its data (by default/var/lib/caddyfor certificates). - For certificate directories (
/var/lib/caddy), ensure Caddy has write permissions. - Example for Linux:
sudo chown -R caddy:caddy /var/www/mysite sudo chmod -R 755 /var/www/mysite sudo chown -R caddy:caddy /var/lib/caddy - In Docker, ensure that data and configuration volumes are mounted correctly and have the right permissions inside the container, or configure Caddy to run as a user with the required UID/GID.
2. DNS and ACME Challenge Issues
Error: Caddy cannot obtain an SSL certificate because the domain validation via the ACME protocol fails. This is most often due to incorrect DNS records or blocked ports.
Consequences: The site is only accessible via HTTP (if forced redirect is not configured), browsers issue warnings about an insecure connection.
How to avoid:
- Ensure that DNS A/AAAA records correctly point to your server's IP address. Use
digornslookupto check:dig +short example.com A - Check that ports 80 and 443 are open on your firewall (e.g.,
ufw allow 80/tcp,ufw allow 443/tcp). Caddy uses port 80 for HTTP-01 domain ownership validation. - For wildcard certificates (
.example.com), ensure you have configured Caddy to use a DNS provider (e.g., Cloudflare, Route 53) and provided it with the necessary API keys. This requires a Caddy plugin and configuration via JSON or Caddyfile with the appropriate syntax. - Check Caddy logs (
sudo journalctl -u caddy) for ACME errors.
3. Port Conflict with Other Services
Error: Caddy cannot start because ports 80 or 443 are already occupied by another process (e.g., another web server like Nginx/Apache, a running Docker container).
Consequences: Caddy fails to start, showing an "address already in use" error.
How to avoid:
- Before starting Caddy, ensure that other services using ports 80 and 443 are stopped or reconfigured to use different ports.
- Use
sudo lsof -i :80andsudo lsof -i :443to find out which process is occupying the ports. - If you are using Caddy in Docker, ensure that ports 80/443 on the host are not occupied, or proxy them through another port if Caddy is not the only public service.
4. Redundant or Illogical Caddyfile Configuration
Error: Attempting to apply too many directives or using them in the wrong order, leading to unexpected behavior or errors.
Consequences: Incorrect routing, non-functional features, 500 errors, increased debugging time.
How to avoid:
- Understand the order of Caddy directive execution. Directives in the Caddyfile are executed in a specific order. For example,
rewriteruns beforereverse_proxy. - Use
handleandrouteblocks for better organization and control over execution order. They allow you to create clearly defined handler chains. - Start simple: Configure basic functionality, then gradually add new directives, testing each step.
- Use
caddy validate --config /etc/caddy/Caddyfileto check syntax before applying the configuration. - Example of using
handle:
This ensures that requests toexample.com { # Handle API requests handle /api/ { reverse_proxy backend:8080 } # Handle all other requests as static files handle { root /var/www/html file_server } }/api/are handled by the proxy, and others by the file server, without conflicts.
5. Lack of Persistent Storage for Certificates in Docker
Error: Running Caddy in Docker without binding a volume for the /data directory inside the container, where certificates and other important data are stored.
Consequences: With each container restart, Caddy loses previously obtained certificates and attempts to acquire them again. This can lead to exceeding Let's Encrypt rate limits and temporary blocking of certificate issuance for your domain.
How to avoid:
- Always mount a named volume or bind-mount for Caddy's
/datadirectory in the Docker container. This ensures that certificates and other data persist across restarts.# Example with a named volume docker run -v caddy_data:/data ... caddy/caddy:latest # Example with bind-mount on host docker run -v /path/on/host/caddy_data:/data ... caddy/caddy:latest - Ensure that the Caddy user inside the container has read/write permissions to this volume.
6. Ignoring Caddy Logs
Error: Not reviewing Caddy logs when issues arise.
Consequences: Lengthy and inefficient debugging, missed warnings about impending certificate expiration or backend issues.
How to avoid:
- Regularly review Caddy logs. Use
sudo journalctl -u caddy -ffor systemd ordocker logs -f caddy_container_namefor Docker. - Set up centralized logging (ELK, Loki, Grafana) for aggregating and analyzing Caddy logs, especially in production environments.
- Increase the logging level to
DEBUGat the beginning of the Caddyfile when debugging complex issues:
Don't forget to revert it back to{ debug # ... other global options }INFOorWARNfor production.
By avoiding these common mistakes, you can significantly enhance the reliability and efficiency of your Caddy infrastructure.
Looking for a server that just works?
Valebyte VPS — NVMe, 24/7 support, deploy in 60 seconds.
Caddy Practical Application Checklist
To ensure a smooth and secure Caddy deployment, follow this step-by-step algorithm. It covers all key aspects from preparation to monitoring.
- Infrastructure Preparation:
- [ ] VPS chosen or Docker/Kubernetes environment configured.
- [ ] Domain name obtained (e.g.,
example.com). - [ ] DNS records (A/AAAA) for the domain or subdomains point to your server's IP address.
- [ ] Ports 80 and 443 checked for availability on the server (firewall, cloud security groups).
- Caddy Installation:
- [ ] Install Caddy according to the chosen method (package manager for VPS or Docker image).
- [ ] Ensure Caddy is installed and can be run (
caddy version).
- Caddyfile Creation/Editing:
- [ ] Create or open
/etc/caddy/Caddyfile(for VPS) or create aCaddyfilein the project directory (for Docker Compose). - [ ] Specify the domain name for your site (e.g.,
example.com). - [ ] Configure the root directory for static files (
root /path/to/your/site) or the target for a reverse proxy (reverse_proxy backend:port). - [ ] Add the
file_serverdirective for static sites. - [ ] Add directives for compression (
encode gzip brotli). - [ ] Enable security HTTP headers (
header { Strict-Transport-Security ... }). - [ ] Configure access logging (
log { output file ... }).
- [ ] Create or open
- Caddyfile Configuration Check:
- [ ] Run
caddy validate --config /etc/caddy/Caddyfile(for VPS) ordocker run --rm -v $PWD/Caddyfile:/etc/caddy/Caddyfile caddy/caddy:latest caddy validate --config /etc/caddy/Caddyfile(for Docker). - [ ] Ensure there are no syntax errors.
- [ ] Run
- Caddy Startup:
- [ ] For VPS:
sudo systemctl reload caddy(if already running) orsudo systemctl start caddy. - [ ] For Docker:
docker-compose up -dordocker run ...with correct volume mounts (especially for/data). - [ ] Check Caddy status:
sudo systemctl status caddyordocker ps.
- [ ] For VPS:
- HTTPS and Functionality Verification:
- [ ] Open your domain in a browser (
https://example.com). - [ ] Ensure the site loads via HTTPS and the "padlock" icon is displayed.
- [ ] Verify the validity of the SSL certificate (by clicking on the padlock in the browser).
- [ ] Check the functionality of all URLs, especially those that are proxied or use redirects.
- [ ] Use online tools, such as SSL Labs SSL Test, to assess the quality of the TLS configuration.
- [ ] Open your domain in a browser (
- Monitoring and Logging Setup:
- [ ] Ensure Caddy logs are written to the specified files.
- [ ] Configure log rotation (built into Caddy or use
logrotate). - [ ] Integrate Caddy logs with your centralized logging system (ELK, Loki) for a production environment.
- [ ] Configure monitoring for Caddy's availability and its backends (Prometheus, Grafana, UptimeRobot).
- Backup:
- [ ] Back up the Caddyfile.
- [ ] Back up Caddy's data directory (
/var/lib/caddyor the mounted volume) to preserve certificates.
- Security Assurance:
- [ ] Ensure the firewall only allows necessary incoming connections (80, 443).
- [ ] Regularly update Caddy to the latest stable version.
- [ ] Conduct periodic audits of the Caddyfile configuration for redundancy or vulnerabilities.
- Documentation:
- [ ] Document the Caddyfile configuration, used ports, DNS records, and deployment instructions.
Cost Calculation / Economics of Using Caddy
When it comes to choosing an infrastructure component, Total Cost of Ownership (TCO) is a key factor. Caddy, being open source, is free in itself, but its use brings significant savings through reduced operating costs and increased efficiency. Let's break down how Caddy impacts project economics in 2026.
1. Direct Costs: Caddy is free, but infrastructure is not
Caddy is distributed under the Apache 2.0 license, which means there are no direct licensing fees. However, you will need infrastructure to run it. Key expense items:
- Virtual Private Server (VPS) or cloud instances: VPS costs can range from $5/month for a basic instance (1 vCPU, 1-2 GB RAM) to hundreds of dollars for powerful machines. For most SaaS projects at startup, a VPS for $10-30/month is sufficient.
- Domain name: ~$10-15 per year.
- DNS service: Many registrars provide it for free; advanced services (e.g., Cloudflare Enterprise) can cost from $20/month and up.
- Monitoring and logging: Basic solutions can be free (Prometheus+Grafana), but for large data volumes and advanced features, paid SaaS services (Datadog, New Relic, Logz.io) may be required, starting from $50/month.
- CDN (Content Delivery Network): If your project has a global audience, a CDN can cost from $20/month to thousands of dollars, depending on traffic volume.
Approximate calculations for different scenarios (2026 prices, estimated):
| Component | Small project (personal blog/MVP SaaS) | Medium project (growing SaaS/API) | Large project (high-load SaaS) |
|---|---|---|---|
| VPS/Cloud instances | $5-15/month (1 vCPU, 1-2GB RAM) | $30-100/month (2-4 vCPU, 4-8GB RAM, multiple instances) | $200-1000+/month (K8s cluster, powerful instances) |
| Domain name | $12/year | $12/year | $12/year |
| DNS service | Free (registrar) | Free/Up to $20/month (Cloudflare Pro) | $50-200+/month (Cloudflare Enterprise) |
| Monitoring/Logging | Free (Prometheus/Grafana) | $50-200/month (Logz.io, Datadog) | $500-2000+/month |
| CDN | Not required/Free (Cloudflare Free) | $20-100/month | $300-5000+/month |
| Total Infrastructure (month) | $5-15 | $100-400 | $1000-8000+ |
2. Hidden Costs and How Caddy Minimizes Them
The true savings from Caddy are realized through reduced indirect costs:
- Engineer time (the most expensive resource):
- SSL/TLS Management: With Caddy, this is virtually zero cost. Automatic HTTPS eliminates the need for manual Certbot setup, Cron jobs, and expiration tracking. For Nginx/Apache, this task can take from a few minutes to several hours per month per domain, especially with many domains or wildcard certificates.
- Configuration: The simple Caddyfile allows engineers to quickly set up new hosts, change routing, or add new features. Complex Nginx/Apache configurations require more time for writing, debugging, and verification.
- Debugging: Clear logs and simple syntax reduce time spent on troubleshooting.
- Risks of downtime and reputation loss:
- An expired SSL certificate leads to website unavailability and loss of user trust. Caddy's automation minimizes this risk.
- Configuration errors can lead to server crashes. The simplicity of Caddyfile reduces the likelihood of such errors.
- Training and onboarding new employees:
- Caddy's low barrier to entry allows new engineers to quickly get familiar with the infrastructure, reducing training costs.
3. How to Optimize Costs with Caddy
- Service Consolidation: Caddy can replace several tools (web server, reverse proxy, load balancer), simplifying the stack and reducing complexity.
- Efficient Resource Utilization: Caddy, written in Go, offers high performance with low memory and CPU consumption. This allows running more services on a single VPS or using less powerful (and cheaper) cloud instances.
- Accelerated Time-to-Market: Rapid deployment of new features and services with automatic HTTPS allows startups to bring products to market faster and get feedback, directly impacting potential revenue.
- Using Free ACME Providers: Caddy works by default with Let's Encrypt, which provides certificates for free, saving $50-200 per year on paid SSL certificates for each domain.
Example calculation of engineer time savings (hypothetical SaaS project with 50 domains):
- Nginx/Apache: Manual certificate renewal (or Certbot setup) for 50 domains, each requiring attention every 3 months. Let's say this takes an average of 15 minutes per domain (check, script execution, reload).
- Monthly: (50 domains * 15 min) / 3 months = 250 min/month = ~4.17 hours/month.
- Annual cost: 4.17 hours * 12 months * $75/hour (average DevOps rate) = $3753.
- Caddy: Virtually 0 minutes/month for certificate management.
- Savings: ~$3753 per year just on certificate management. And if we consider time for debugging, initial setup, and training, the savings could be 2-3 times higher.
In conclusion, while Caddy has no direct cost, it is a powerful tool for reducing operational expenses, increasing team efficiency, and accelerating development. For DevOps engineers, SaaS founders, and CTOs who focus on TCO, Caddy represents an extremely valuable investment.
Cases and Examples of Caddy Usage in Real Projects
Theory is good, but real-world examples of Caddy usage demonstrate its flexibility and power in various scenarios. Let's look at a few cases that illustrate how Caddy can be applied to solve specific problems.
Case 1: Modern Web Server for SaaS Backend on Python/Node.js in Docker Compose
Project Description: A small but rapidly growing SaaS project with a Node.js backend (API) and a React frontend (static files). Everything is deployed in Docker Compose on a single VPS. Requirements: automatic HTTPS, API proxying, serving static files, easy scalability.
Problem: Using Nginx required a separate container with Certbot for SSL, complex configuration, and manual certificate renewal. This consumed a lot of time for the sole DevOps engineer.
Solution with Caddy:
A docker-compose.yml was used with three services: caddy, backend (Node.js API), and frontend (nginx for React application static files, although Caddy could serve them itself).
# docker-compose.yml
version: '3.8'

services:
  caddy:
    image: caddy/caddy:latest
    restart: unless-stopped
    ports:
      - "80:80"
      - "443:443"
    volumes:
      - ./Caddyfile:/etc/caddy/Caddyfile:ro
      - caddy_data:/data
    networks:
      - my_app_network

  backend:
    build: ./backend # Dockerfile for Node.js API
    restart: unless-stopped
    environment:
      - PORT=8080
    networks:
      - my_app_network

  frontend:
    build: ./frontend # Dockerfile for Nginx with React static files
    restart: unless-stopped
    networks:
      - my_app_network

volumes:
  caddy_data:

networks:
  my_app_network:
    # Define if an external network is needed
Caddyfile for this scenario:
# Caddyfile
my-saas.com {
    # Proxy all requests to /api to the backend
    handle /api/ {
        reverse_proxy backend:8080
    }

    # Serve static files from the frontend for all other requests
    handle {
        reverse_proxy frontend:80
    }

    # Enable logging
    log {
        output file /var/log/caddy/access.log {
            roll_size 10mb
            roll_keep 5
        }
        format json
    }
}
Results:
- Automatic HTTPS configured in minutes.
- Configuration and maintenance significantly simplified.
- The DevOps engineer was able to focus on more important tasks.
- High performance and reliability thanks to HTTP/3 and TLS 1.3.
- Easy scalability: to increase backend power, simply add another
backendinstance to Docker Compose, and Caddy will automatically start load balancing between them.
Case 2: Caddy as an Ingress Controller for a Kubernetes Cluster (Nginx Ingress Alternative)
Project Description: A large SaaS project with a microservice architecture, deployed in a Kubernetes cluster. A simple and reliable system was required for routing external traffic to internal services, with automatic HTTPS and HTTP/3 support.
Problem: Nginx Ingress Controller was too complex to configure for certificate management and required additional resources for Cert-Manager. The team was looking for a more lightweight and automated alternative.
Solution with Caddy:
Caddy was deployed as an Ingress controller. Although Caddy does not have a native Ingress controller like Nginx or Traefik, its dynamic configuration API allows for easy integration with an operator that monitors Ingress resources and updates Caddy's configuration.
Example YAML for Caddy deployment (simplified):
# caddy-deployment.yaml
apiVersion: apps/v1
kind: Deployment
metadata:
  name: caddy-ingress
  namespace: default
spec:
  replicas: 2
  selector:
    matchLabels:
      app: caddy
  template:
    metadata:
      labels:
        app: caddy
    spec:
      containers:
        - name: caddy
          image: caddy/caddy:latest
          ports:
            - containerPort: 80
            - containerPort: 443
            - containerPort: 2019 # Caddy Admin API
          volumeMounts:
            - name: caddy-config
              mountPath: /etc/caddy
            - name: caddy-data
              mountPath: /data
      volumes:
        - name: caddy-config
          configMap:
            name: caddy-config
        - name: caddy-data
          persistentVolumeClaim:
            claimName: caddy-pvc
---
apiVersion: v1
kind: Service
metadata:
  name: caddy-ingress-svc
  namespace: default
spec:
  type: LoadBalancer # Or NodePort/ClusterIP with external LB
  ports:
    - name: http
      port: 80
      targetPort: 80
    - name: https
      port: 443
      targetPort: 443
  selector:
    app: caddy
The Caddyfile configuration can initially be minimal and then dynamically updated via the API when new Ingress resources are created, or used with a dedicated Caddy operator.
Results:
- Simplified HTTPS management for all services in the cluster.
- Reduced number of components (Cert-Manager not needed).
- Performance improved due to HTTP/3.
- High reliability and fault tolerance thanks to deploying multiple Caddy instances.
- The DevOps team gained a simpler tool for managing external traffic.
Case 3: Caddy for Serving Static Sites and Blogs on a VPS
Project Description: Several personal blogs, portfolios, and small static websites managed by a single system administrator on one VPS. Requirements: ease of deployment, low cost, automatic HTTPS for each site.
Problem: Maintaining Nginx for each site with manual SSL configuration via Certbot for each domain was laborious and error-prone. Expiring certificates were a constant headache.
Solution with Caddy:
Caddy was installed on the VPS via a package manager. All sites were configured in a single /etc/caddy/Caddyfile.
# /etc/caddy/Caddyfile

# Global options
{
    email [email protected] # For Let's Encrypt notifications
    log {
        output file /var/log/caddy/global_access.log
        format json
    }
}

myblog.com {
    root  /var/www/myblog
    file_server
    encode gzip brotli
}

portfolio.net {
    root  /var/www/portfolio
    file_server
}

static-app.org {
    root  /var/www/static-app
    file_server
    # Additional headers, if needed
    header {
        Cache-Control "public, max-age=3600"
    }
}
Results:
- All sites received HTTPS automatically and without manual intervention.
- Configuration became significantly simpler and faster.
- Maintenance time was reduced almost to zero.
- The system administrator gained peace of mind from automating routine tasks.
- High performance and security for all static resources.
These cases demonstrate that Caddy is a versatile and effective solution for a wide range of tasks, from simple static sites to complex microservice architectures, significantly simplifying engineers' lives and increasing project reliability.
Looking for a server that just works?
Valebyte VPS — NVMe, 24/7 support, deploy in 60 seconds.
Tools and Resources for Effective Work with Caddy
To use Caddy most effectively, it's important to know not only the web server itself but also the accompanying tools that simplify its setup, debugging, monitoring, and maintenance. Here is a selection of essential resources and utilities.
1. Official Caddy Documentation
caddyserver.com/docs/
This is your primary source of information. Caddy's documentation is comprehensive, up-to-date, and rich with examples. It covers all aspects: from installation and basic configuration to advanced topics such as JSON API, modules, and extensions. Be sure to familiarize yourself with it before you start.
2. Caddy Command-Line Tools
The Caddy executable itself is a powerful tool for configuration management.
caddy validate --config /path/to/Caddyfile: An indispensable tool for validating Caddyfile syntax before applying it. Helps avoid errors that can lead to downtime.caddy fmt --overwrite /path/to/Caddyfile: Formats your Caddyfile, bringing it to a standard style. Useful for maintaining clean and readable configuration.caddy run --config /path/to/config.json: Starts Caddy with the specified JSON configuration file.caddy reload --config /path/to/config.json: Reloads Caddy's configuration without stopping the service, using the Admin API.caddy start,caddy stop,caddy restart: Commands for managing Caddy if it is not running as a system service.
3. Tools for Debugging Network Connections and SSL
curl: Universal tool for making HTTP requests. Use it to check website availability, headers (curl -I https://example.com), redirects, and content.curl -vI https://example.com # Detailed information about headers and the TLS process curl --http3 https://example.com # Check HTTP/3 operationopenssl: Tool for working with SSL/TLS. Allows checking certificates, connections, ciphers.openssl s_client -connect example.com:443 -servername example.com # Check information about the certificate, TLS protocol, and cipher used.dig/nslookup: For checking DNS records. Ensure your domain points to the correct Caddy server IP address.dig +short example.com Ass/netstat: For checking open ports on the server and active network connections.sudo ss -tulpn | grep caddytcpdump/Wireshark: For deep network traffic analysis. Useful when debugging complex proxying or SSL handshake issues.
4. System Tools for Monitoring and Logging
journalctl(for systemd): Primary tool for viewing Caddy logs if it is installed as a system service.sudo journalctl -u caddy -f # Follow Caddy logs in real time sudo journalctl -u caddy --since "1 hour ago" # Logs for the last hourdocker logs: For viewing Caddy logs in a Docker container.docker logs -f my_caddy_container # Follow Caddy container logshtop/top: For monitoring resource usage (CPU, RAM) of Caddy and other processes on the server.- Prometheus + Grafana: A powerful combination for monitoring Caddy metrics (via the built-in
/metricsendpoint or plugins) and data visualization. - ELK Stack (Elasticsearch, Logstash, Kibana) / Grafana Loki: For centralized collection, storage, and analysis of Caddy logs, especially in JSON format.
5. Online Resources for Configuration Validation
- SSL Labs SSL Test: An excellent tool for assessing the quality of your TLS configuration, ciphers, and protocols used. Caddy typically receives very high scores "out of the box".
- Security Headers: Checks your website's HTTP security headers (HSTS, CSP, X-Frame-Options, etc.). Helps ensure you are using all necessary protection measures.
- DNS Checker: Allows you to check the propagation of DNS records worldwide. Useful when debugging ACME validation issues.
6. Caddy Community
- Caddy Community Forum: An active community where you can ask questions, find solutions to problems, and share experiences.
- GitHub Caddy repository: For reporting bugs, requesting features, and viewing source code.
By using this arsenal of tools and resources, you will be able to work effectively with Caddy, ensuring its reliable and secure operation in any environment.
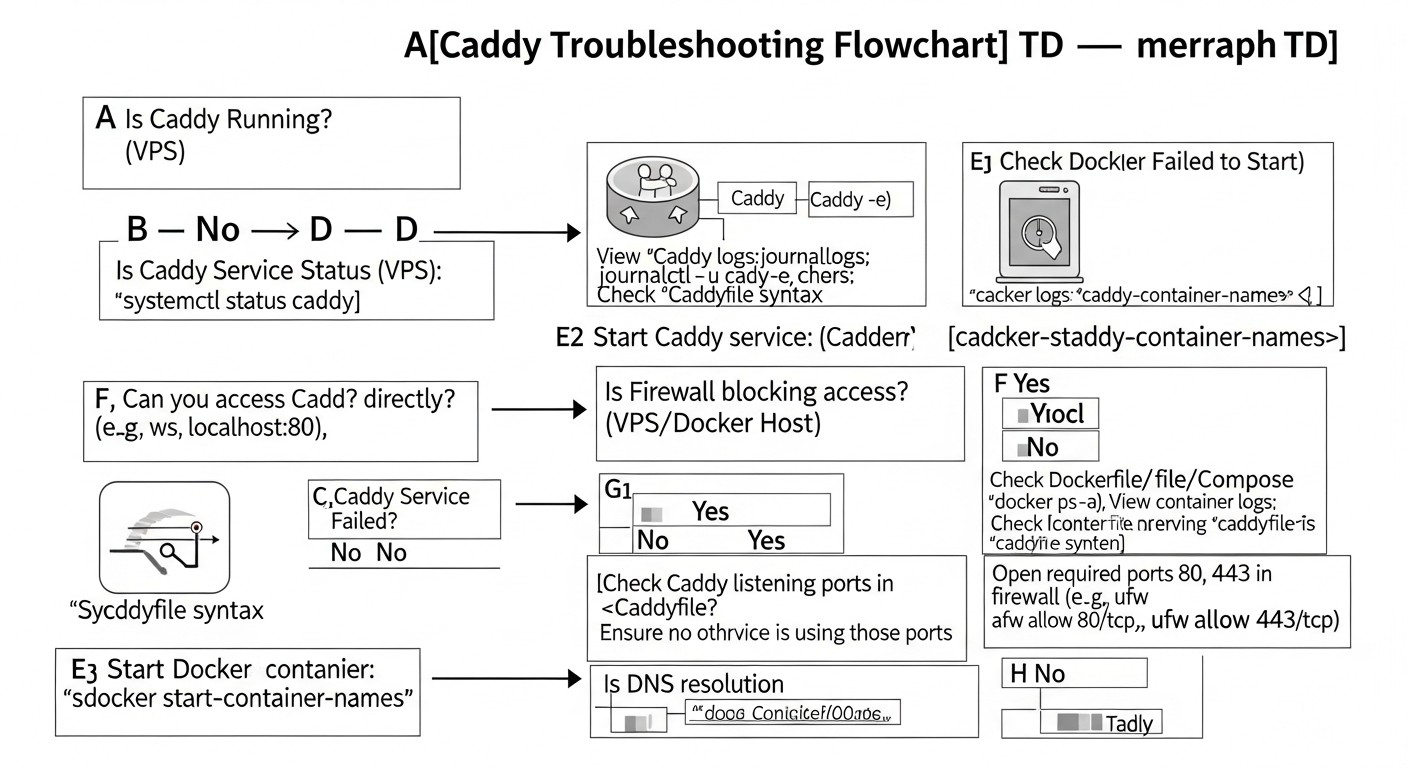
Troubleshooting: Resolving Caddy Issues
Even the simplest tool can encounter problems. Knowing typical errors and methods for diagnosing them will help you quickly restore Caddy's functionality. Here we will look at the most common problems and their solutions.
1. Caddy does not start or restart
Symptoms:
sudo systemctl status caddyshows "failed" or "inactive".docker logs caddy_containershows errors during startup.- Message "address already in use".
Diagnosis and Solution:
- Check Caddyfile syntax: Always start with this.
If you are using JSON configuration:caddy validate --config /etc/caddy/Caddyfile
Correct all errors indicated by the validator.caddy validate --config /path/to/config.json - Check Caddy logs:
Look for error messages such as "permission denied", "address already in use", "config error".sudo journalctl -u caddy --since "5 minutes ago" # For systemd docker logs my_caddy_container # For Docker - Port conflict: If you see "address already in use", check which process is occupying ports 80 and 443:
Stop the conflicting service or reconfigure Caddy to use other ports (if possible, but for public sites it's better to use 80/443).sudo ss -tulpn | grep :80 sudo ss -tulpn | grep :443 - Permissions: Make sure the Caddy user has read permissions for the Caddyfile and write permissions for the data directory (
/var/lib/caddyor a mounted volume). See the "Typical Errors" section.
2. Site inaccessible via HTTPS (certificate error, HTTP only)
Symptoms:
- Browser shows "Your connection is not secure" or "NET::ERR_CERT_DATE_INVALID" warning.
- Site is only accessible via HTTP, and HTTPS does not load or returns an error.
- Caddy logs complain about ACME errors.
Diagnosis and Solution:
- Check DNS records: Make sure your domain's A/AAAA records point to the Caddy server's IP address.
dig +short example.com A - Check open ports: ACME verification (HTTP-01) requires access to port 80. Make sure ports 80 and 443 are open on the firewall.
If you are using a cloud provider (AWS, GCP, Azure), check Security Groups or Network Security Groups.sudo ufw status # If using UFW - Caddy logs (DEBUG level): Temporarily set Caddy's logging level to
DEBUGin the global Caddyfile options:
Restart Caddy and check the logs. Look for detailed messages from the ACME client. Common errors: "too many certificates already issued", "rate limit exceeded" (this means you tried to get a certificate too often), "invalid response from ACME server".{ debug } - Check data directory permissions: Make sure Caddy can write certificates to its data directory (
/var/lib/caddyor a mounted volume in Docker). - Wildcard certificates: If you are requesting a wildcard certificate (
.example.com), make sure a DNS provider is configured in the Caddyfile and the necessary API keys are provided. HTTP-01 verification does not work for wildcards. - Using
openssl: Check which certificate Caddy is serving:
Make sure the domain name in the certificate matches yours.openssl s_client -connect example.com:443 -servername example.com | openssl x509 -noout -text
3. 502 Bad Gateway error (when using reverse_proxy)
Symptoms:
- Caddy is running, but when accessing the proxied application, you see a 502 Bad Gateway error.
- Caddy logs show messages like "dial tcp 127.0.0.1:8080: connect: connection refused" or "context deadline exceeded".
Diagnosis and Solution:
- Check backend availability: The most common reason is that the backend application is not running or is listening on a different port/address.
If the backend is in Docker Compose:# On the Caddy server, if the backend is local curl http://localhost:8080/ # Or your_IP:port
Make sure the backend is accessible and responding.docker-compose logs my_backend_service - Correct address and port in
reverse_proxy: Make sure you have specified the correct IP address or hostname and port of the backend. In Docker Compose, use the service name (backend_service:8080). - Backend firewall: If the backend is running on another server or has its own firewall, make sure it allows incoming connections from the Caddy server to the backend port.
- Docker network issues: If Caddy and the backend are in different Docker networks, make sure they can communicate. Check that both containers are in the same Docker network.
- Timeouts: If the backend responds slowly, Caddy may time out. Increase the timeout in the
reverse_proxydirective:reverse_proxy localhost:8080 { transport http { read_timeout 30s write_timeout 30s } }
4. Caddy does not serve static files or returns 404/403
Symptoms:
- When accessing static files, you see 404 Not Found or 403 Forbidden.
- Caddy logs indicate problems with file access.
Diagnosis and Solution:
- Correct root directory (
root): Make sure therootdirective in your Caddyfile points to the correct path for your static files.
The asteriskroot * /var/www/html*inroot *is important as it indicates that the root directory applies to all requests unless otherwise specified. - File permissions: Make sure the Caddy user (usually
caddy) has read permissions for files and execute permissions for directories.sudo chown -R caddy:caddy /var/www/html sudo chmod -R 755 /var/www/html # 755 for directories, 644 for files file_serverdirective: Make sure you have included thefile_serverdirective in your site block. Without it, Caddy will not attempt to serve files.example.com { root * /var/www/html file_server }- Index files: If you expect
/to serveindex.html, make sureindex.htmlexists in the root directory. Caddy looks forindex.htmlby default.
5. Caddy does not renew certificates
Symptoms:
- The certificate expires, even though Caddy should have renewed it.
- Caddy logs do not mention successful renewal or show ACME-related errors.
Diagnosis and Solution:
- Check Caddy logs: Set the
DEBUGlevel and restart Caddy. Look for errors related to ACME, DNS, or the firewall that might have prevented domain verification. - Port 80/443 availability: For HTTP-01 verification, Caddy must be able to access port 80. Make sure it is open.
- Data directory availability: Caddy must have write permissions to its data directory to save renewed certificates.
- Let's Encrypt limits: If you frequently restart Caddy without saving data or change domain configurations, you may encounter Let's Encrypt rate limits. In this case, you will have to wait.
- Reset ACME state: In an extreme case, you can delete the
/data/acmedirectory (or/var/lib/caddy/acme) and restart Caddy. This will force it to request new certificates from scratch (but be careful with limits).
When debugging, always start by checking Caddy's logs; they are your best friend. Increasing the logging level to DEBUG can provide valuable information, but remember to revert it to INFO or WARN in production.
Frequently Asked Questions (FAQ) about Caddy
1. Caddy vs. Nginx: What to Choose in 2026?
The choice between Caddy and Nginx depends on your priorities. Caddy stands out for its simplicity, automatic HTTPS, built-in HTTP/3 support, and ease of use in containerized environments. It is ideal for startups, SaaS projects, and DevOps teams that value deployment speed and minimal manual effort. Nginx remains the choice for projects with very specific, low-level performance requirements or for those who already have deep expertise in its configuration. For most modern web applications, Caddy will be a more efficient and economical solution.
2. Can Caddy be Used for High-Load Projects?
Yes, absolutely. Caddy, written in Go, demonstrates excellent performance and stability even under high load. Its architecture efficiently utilizes multi-core processors, and built-in HTTP/3 and TLS 1.3 support ensures maximum speed and security. Many large companies and SaaS projects successfully use Caddy in production. It is important to configure Caddy correctly (e.g., caching, load balancing) and ensure sufficient server resources.
3. Does Caddy Support Wildcard Certificates? How to Configure Them?
Yes, Caddy supports wildcard certificates (e.g., .example.com). Obtaining them requires ACME DNS-01 verification, as HTTP-01 cannot confirm ownership of all subdomains. You will need to use a Caddy plugin for your DNS provider (e.g., Cloudflare, AWS Route 53) and provide Caddy with API keys to manage DNS records. Configuration is added to the Caddyfile or JSON configuration, specifying the domain with the wildcard and the DNS plugin used.
4. How Does Caddy Handle Static Files and Caching?
Caddy can efficiently serve static files using the file_server directive. It automatically sets correct MIME types and supports conditional requests (If-Modified-Since, ETag). For client-side caching, Caddy allows you to add HTTP headers Cache-Control and Expires. For server-side caching, you can use plugins or integrate Caddy with external caching proxies like Varnish, or CDNs.
5. Is Caddy Suitable for Production Environments?
Absolutely. Caddy is widely used in production environments worldwide. Its stability, security, automation, and performance make it an excellent choice for a wide range of tasks, from small blogs to complex microservice architectures. The Caddy development team actively supports the project, regularly releasing security updates and new features.
6. How to Ensure Caddy's Security?
Caddy is inherently designed with a focus on security: it uses TLS 1.3 by default, automatically sets HSTS, and has sensible cipher settings. For additional security: use a firewall to restrict access to ports; run Caddy as an unprivileged user; regularly update Caddy; use directives to rate limit requests and configure other HTTP security headers (CSP, X-Frame-Options); avoid disclosing sensitive information in errors.
7. Can Multiple Caddy Instances Run on One Server?
Yes, they can. If each Caddy instance serves different domains or listens on different ports, this will not cause problems. For different domains, Caddy itself can manage many sites within a single instance. If you want to run multiple separate Caddy instances, make sure they use different ports (especially for the Admin API, which defaults to 2019) and different directories for storing data (certificates).
8. Does Caddy Support WebSockets?
Yes, Caddy fully supports WebSockets. When using Caddy as a reverse proxy, it automatically detects and proxies WebSocket connections without any additional configuration. This makes it ideal for modern web applications that use WebSockets for interactive real-time communication.
9. How to Update Caddy to a New Version?
The method for updating Caddy depends on how it was installed:
- For installation via package manager (apt, yum): Use standard system update commands (
sudo apt update && sudo apt upgrade caddy). - For Docker: Update the Caddy image (
docker pull caddy/caddy:latest) and restart the container. Ensure your data volume is mounted to avoid losing certificates. - For manual installation: Download the new binary from the official website and replace the old one, then restart Caddy.
10. Can Caddy be Used as an API Gateway?
Yes, Caddy is perfectly suited for the role of an API Gateway. Thanks to its capabilities for reverse proxying, load balancing, path/header-based routing, as well as built-in HTTPS and HTTP/3 support, it can efficiently direct requests to various microservices. With the Caddy API, you can even dynamically add/remove routes, making it a flexible solution for API management.
11. How to Configure Rate Limiting in Caddy?
Caddy does not have a built-in rate_limit directive like Nginx, but this functionality can be implemented using plugins or by combining several directives. For example, you can use the ip_filter directive or write your own plugin. As of 2026, there are third-party plugins, or you can use an external WAF (Web Application Firewall) or a specialized API Gateway for more complex rate limiting scenarios.
12. Does Caddy Support HTTP/2 Server Push?
Yes, Caddy supports HTTP/2 Server Push. You can use the push directive in the Caddyfile to specify resources that should be sent to the client along with the main request, before the client requests them itself. This can significantly speed up page loading by reducing the number of "round trip" requests. However, with the advent of HTTP/3 and its improved handling of multiple streams, the need for explicit Server Push has become less acute.