Podman and Systemd: Lightweight Container Orchestration on VPS without Docker and Kubernetes in 2026
TL;DR
- Resource Efficiency: Podman + Systemd offers significantly less overhead compared to Docker and Kubernetes, ideal for cost-effective VPS.
- Enhanced Security: The absence of a constantly running Docker daemon and native support for rootless containers in Podman minimize the attack surface.
- Native OS Integration: Systemd, as the standard Linux service manager, ensures deep and reliable integration of containers into the system's lifecycle.
- Simplicity and Predictability: Managing containers via familiar Systemd units reduces complexity and simplifies debugging, especially for system administrators.
- Scalability for Small and Medium Projects: An ideal solution for one or several VPS where full-fledged Kubernetes is overkill, and Docker Compose does not provide the necessary level of control and reliability.
- Relevance in 2026: The stable development of Podman and the widespread use of Systemd make this combination a mature and reliable choice for production environments.
Introduction
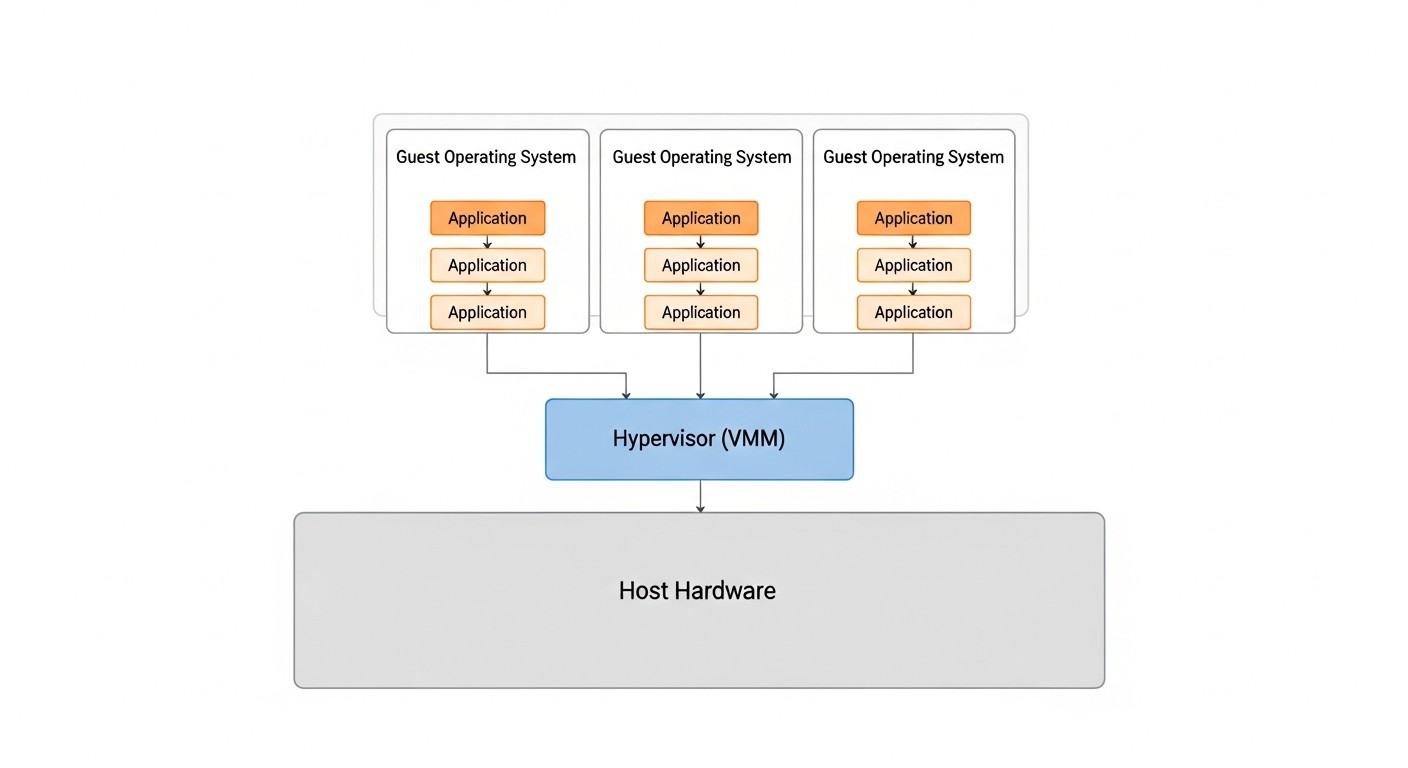 Diagram: Introduction
In the rapidly evolving world of cloud technologies and microservices, where giants like Docker and Kubernetes dominate, the need for more lightweight and economical solutions is often overlooked. By 2026, this need has only intensified. VPS providers offer increasingly powerful, yet still resource-constrained machines, and paying for excessive orchestration overhead becomes an unaffordable luxury for many projects.
This article is dedicated to the combination of Podman and Systemd — a powerful yet underestimated duo that allows for efficient container management on one or more VPS without the need to deploy heavyweight Kubernetes clusters or depend on the Docker daemon. We will explore why this approach is becoming increasingly relevant for startups, small SaaS projects, backend developers, and DevOps engineers striving for maximum efficiency and cost savings.
What problems does this article solve?
- Excessive Overhead: The Docker Daemon consumes resources even when idle, and Kubernetes requires significant computing power and complex configuration. Podman operates without a daemon, and Systemd is natively integrated into most Linux distributions, minimizing consumption.
- Management Complexity: Setting up and maintaining a Kubernetes cluster is a specialized skill. Managing containers via Systemd units is much simpler and more understandable for system administrators accustomed to standard Linux services.
- Security: Podman's security model, focused on rootless containers and the absence of a central daemon, significantly reduces risks compared to Docker.
- Cost Savings: Lower resource consumption means the ability to use cheaper VPS, which is critically important for startups and projects with limited budgets.
- Vendor/Platform Lock-in: The Podman+Systemd approach is based on open standards (OCI) and native Linux components, reducing dependence on specific proprietary solutions or ecosystems.
Who is this guide for?
This guide is intended for DevOps engineers, backend developers (especially in Python, Node.js, Go, PHP), SaaS project founders, system administrators, and technical directors of startups who are looking for a reliable, secure, and economical solution for deploying containerized applications on a VPS. If you value simplicity, efficiency, and control over your infrastructure, but are not willing to sacrifice the benefits of containerization, then this article is for you.
By 2026, Podman has firmly established itself as a full-fledged and often preferred alternative to Docker, especially in server environments. Its integration with Systemd opens new horizons for efficient and secure container operation, which we will discuss in detail further on.
Key Criteria/Selection Factors
 Diagram: Key Criteria/Selection Factors
When choosing a container orchestration strategy on a VPS, it is necessary to consider many factors that directly affect performance, security, cost, and ease of operation. In 2026, as technologies have reached a certain maturity, these criteria have become even clearer and more critical.
1. System Resource Consumption (Resource Footprint)
This is arguably the most important criterion for a VPS. Every megabyte of RAM and every percentage of CPU consumed by the orchestration system itself means fewer resources for your application. High overhead leads to the need to purchase a more expensive VPS or to application performance degradation. Podman, operating without a daemon, and Systemd, being part of the OS kernel, minimize this consumption. We evaluate it by CPU and RAM consumption at idle, as well as by its impact on container startup latencies.
Why it's important: Directly affects infrastructure costs and application performance, especially with limited resources. For SaaS projects, this means the difference between profitability and loss.
How to evaluate: Measure RAM and CPU consumption on a clean installation after system startup and after deploying a test container. Tools: htop, free -h, top, systemd-analyze blame.
2. Security (Security Posture)
In 2026, cybersecurity threats continue to grow, and the solution's architecture must be as secure as possible. The absence of a constantly running daemon (as in Docker) eliminates an entire category of vulnerabilities. Support for rootless containers, where a container runs as an unprivileged user, significantly reduces potential damage in the event of a compromise. Container isolation, network policy management, and update mechanisms are also important.
Why it's important: Protects user data, prevents unauthorized access, complies with regulatory requirements (GDPR, CCPA, etc.). A single security breach can cost reputation and business.
How to evaluate: Analyze the security model (daemon vs. daemonless), the presence and maturity of rootless mode, isolation mechanisms (namespaces, cgroups), integration with the firewall (firewalld, nftables).
3. Ease of Deployment & Management
Time is money. The faster an application can be deployed and the easier it is to maintain, the more efficient the team. This includes intuitive configuration, adequate documentation, ease of updates, and debugging. For system administrators accustomed to Systemd, managing containers through familiar units significantly simplifies their work.
Why it's important: Reduces Time-to-Market, lowers operational expenses (OpEx), decreases the likelihood of errors during deployment and maintenance.
How to evaluate: Number of steps to deploy a typical application, complexity of configuration files, availability of monitoring and logging tools, learning curve for a new team.
4. Reliability & Stability
Production systems must be stable and fault-tolerant. This means that the orchestration system must correctly handle restarts, container failures, and server reboots. Systemd, as the cornerstone of most Linux systems, is known for its reliability and rich capabilities for managing the lifecycle of services, including automatic restarts, dependencies, and timers.
Why it's important: Ensures continuous operation of services, minimizes downtime, which is critically important for SaaS projects and online services.
How to evaluate: Testing under various failure scenarios (container stop, VPS reboot), checking logging and recovery mechanisms, maturity and activity of the community.
5. Ecosystem & Tooling
A developed ecosystem of tools for image building (Buildah), registry management (Skopeo), monitoring, CI/CD integration, and debugging significantly simplifies work. Although Podman does not have as extensive an ecosystem as Docker, it is compatible with most Docker tools due to OCI compatibility and is actively developing. Integration with Systemd adds the power of native Linux tools.
Why it's important: Increases the productivity of developers and DevOps engineers, allows for automation of routine tasks, simplifies integration into existing CI/CD pipelines.
How to evaluate: Availability of tools for various stages (build, deploy, monitor), compatibility with existing standards (OCI), development and support activity.
6. Compatibility & Migration
The ability to use existing Dockerfiles and images without changes is a huge advantage. The ease of migration from other platforms (e.g., Docker Compose) is also important. Podman is fully compatible with Docker images and Dockerfiles, making the transition as painless as possible.
Why it's important: Reduces costs for retraining and rewriting existing projects, allows the use of established practices and images.
How to evaluate: Ability to run existing Docker images, compatibility with Dockerfiles, availability of tools for converting or generating configurations.
7. Flexibility & Customization
The ability to fine-tune container behavior, network configurations, volume mounting, and resource management. Systemd units provide an extremely flexible and powerful mechanism for defining all aspects of service operation, including dependencies, cgroups, environment variables, and much more.
Why it's important: Allows adapting the solution to specific project requirements, optimizing performance and security, and implementing complex deployment scenarios.
How to evaluate: Depth of settings available through configuration files (Systemd unit files), support for various network modes, ability to fine-tune resources.
These criteria form the basis for making an informed decision about choosing Podman and Systemd as a container orchestration strategy, especially when it comes to deployment on limited VPS resources.
Comparative Table: Podman + Systemd vs. Alternatives (relevant for 2026)
 Diagram: Comparative Table: Podman + Systemd vs. Alternatives (relevant for 2026)
In this table, we compare the Podman + Systemd combination with the most common alternatives for deploying applications on a VPS, considering criteria relevant for 2026. VPS prices are approximate and may vary depending on the provider and region.
| Criterion |
Podman + Systemd |
Docker Compose |
K3s (single node) |
Bare Metal (without containers) |
| Primary Purpose |
Lightweight orchestration for 1-5 VPS, high security, native OS integration. |
Local development, simple deployment on 1 VPS, quick assembly of multiple services. |
Lightweight Kubernetes for small clusters or Edge computing. |
Maximum control, manual dependency management, no isolation. |
| RAM Consumption (idle) |
~50-100 MB (Podman runtime only) |
~150-300 MB (Docker Daemon + Compose) |
~500-800 MB (K3s control plane + agent) |
~20-50 MB (OS only) |
| CPU Consumption (idle) |
~0-1% |
~1-3% |
~3-7% |
~0% |
| Setup Complexity |
Medium (learning Systemd unit files) |
Low (simple YAML) |
High (Kubernetes concepts, YAML manifests) |
Medium (manual installation, web server config, DB) |
| Security |
High (daemonless, rootless by default, Systemd isolation) |
Medium (single daemon, rootful by default) |
Medium (cluster architecture, RBAC, but more complex to configure) |
Depends on configuration (high with proper isolation, low without it) |
| Lifecycle Management |
Native Systemd (start, stop, restarts, dependencies) |
docker-compose up/down/restart |
Kubernetes Deployment, StatefulSet, Services |
Manual or via Systemd unit files |
| Scalability |
Vertical on a single VPS, horizontal on multiple VPS (with external orchestration) |
Limited (single VPS only) |
Horizontal (easy to add nodes) |
Vertical only on a single VPS |
| VPS Price (2 vCPU, 4GB RAM, 80GB SSD) |
$10-15/month (more resources remain for applications) |
$15-20/month (more RAM needed for Docker Daemon) |
$20-30/month (significant K3s overhead) |
$10-15/month (but without container advantages) |
| Learning Curve |
Medium (Podman is similar to Docker, Systemd requires understanding) |
Low (very easy to learn) |
High (large number of concepts) |
Medium (requires deep understanding of OS and applications) |
| CI/CD Applicability |
High (Podman for image building, Systemd for deployment) |
High (Docker Compose for building and deployment) |
High (kubectl, Helm) |
Low (scripts, Ansible) |
| Maintenance and Updates |
System-wide (Podman, Systemd updates) |
Docker Engine and Compose updates |
K3s, Kubernetes component updates |
Manual update of each application and dependencies |
Table Conclusion: Podman + Systemd occupies a unique niche between the simplicity of Docker Compose and the power of Kubernetes. It offers significantly better resource efficiency and security than Docker Compose, while remaining much less complex and resource-intensive than even a lightweight K3s. For projects requiring reliable containerization on one or more VPS without excessive overhead, this is the ideal choice in 2026.
Detailed Overview of Podman and Systemd
 Diagram: Detailed Overview of Podman and Systemd
For a complete understanding of the benefits of the Podman and Systemd combination, it is necessary to delve deeply into the functionality of each component and examine how they complement each other.
Podman: Daemonless Containers
Podman (POD MANager) is a tool for managing containers and images, compatible with the OCI (Open Container Initiative) standard. It was developed by Red Hat as a direct replacement for Docker, addressing many of its shortcomings, primarily the dependency on a constantly running daemon.
Podman Advantages:
- Daemonless Architecture: The main difference and advantage of Podman. The absence of a central daemon means that Podman does not consume resources in the background when there are no active containers. Each container runs as a child process of Podman, which can then be handed over to Systemd for management. This significantly enhances security, as there is no single point of failure or vulnerability that could be exploited to control the entire system.
- Rootless Containers: Podman is inherently designed to run containers as an unprivileged user. This means that even if an attacker compromises a container, they will not gain root access to the host system. This fundamentally changes the security model compared to Docker, where rootless mode appeared much later and is still not the default or entirely problem-free.
- OCI Compatibility: Podman is fully compatible with OCI standards for images and runtimes. This means you can use the same Dockerfiles, the same images from Docker Hub (or any other registry), and the same commands (most Podman commands are Docker aliases). Migrating from Docker to Podman often boils down to replacing
docker with podman in scripts.
- Pods Concept: Podman supports the concept of "pods" — groups of containers that share a network stack and other resources, similar to pods in Kubernetes. This allows for easy orchestration of related services (e.g., web server and proxy) on a single host, using Systemd to manage the entire pod.
- Tools: In addition to
podman itself, the ecosystem includes Buildah for building images (often more flexible than docker build) and Skopeo for working with images in registries (copying, inspecting without downloading).
- Cgroups v2: Podman actively uses and supports Cgroups v2, which provides more efficient and precise resource management for containers compared to Cgroups v1, which dominated in Docker.
Podman Disadvantages:
- Less Mature Tool Ecosystem: While Podman is actively developing, some specific tools created exclusively for Docker may not work directly or may require adaptation. For example,
podman-compose exists, but is not always 100% functionally identical to docker-compose.
- Less Widespread Popularity: Despite its technical advantages, Docker remains the de facto standard, and finding ready-made solutions or expertise for Podman can be more challenging, although the situation is rapidly changing.
- Networking Model: For rootless containers, the networking model can be slightly more complex to configure (e.g., for publishing ports below 1024), requiring the use of utilities like
slirp4netns or netavark/aardvark-dns.
Who Podman is for: For those who value security, resource efficiency, and native integration with Linux, especially on VPS or in environments where a Docker daemon is undesirable. Ideal for developers, system administrators, and startup founders who need a powerful yet lightweight container environment.
Systemd: Linux Service Manager
Systemd is an init system and service manager for Linux operating systems. It has become the de facto standard for most modern distributions, replacing older SysVinit and Upstart. Systemd provides a powerful and flexible framework for managing the lifecycle of almost any process or service in the system.
Systemd Advantages:
- Native OS Integration: Systemd is part of the core of most Linux distributions, ensuring deep and seamless integration. It launches processes, manages their dependencies, monitors their status, and automatically restarts them in case of failures.
- Powerful Service Management: Systemd unit files allow for very precise configuration of service behavior: from start and stop commands to dependencies, resource limits (cgroups), environment variables, logging, and restart policies. This makes it ideal for managing containers as regular system services.
- Logging and Monitoring:
journalctl, part of Systemd, provides a centralized logging system for all services. This significantly simplifies the collection and analysis of container logs, making debugging more efficient.
- Timers and Events: Systemd Timer units can replace
cron for scheduling container launches, and Path units can launch containers when files change. This opens up broad possibilities for automation.
- Isolation and Security: Systemd provides various isolation mechanisms for services, such as
PrivateTmp, ProtectSystem, CapabilityBoundingSet, RestrictAddressFamilies, and others, which can be applied to containers launched via Systemd, further enhancing their security.
- Maturity and Reliability: Systemd is a very mature and well-tested Linux component, used in millions of production systems worldwide. Its reliability is beyond doubt.
Systemd Disadvantages:
- Steep Learning Curve: For newcomers, Systemd can seem complex due to the abundance of options and intricacies in unit files. However, for system administrators, it is a familiar tool.
- "All-in-one" Philosophy: Some criticize Systemd for attempting to take on too many functions beyond a simple init system.
- Not Designed for Cluster Orchestration: Systemd is effective on a single host but does not provide native mechanisms for managing containers across multiple machines. This would require an external tool (e.g., Ansible, Terraform).
Who Systemd is for: For everyone working with Linux servers. Its use for managing containers is a natural extension of its primary function, especially for system administrators who value control and predictability.
Podman and Systemd Integration: Synergy
The strength of the Podman and Systemd combination lies in their synergy. Podman provides a lightweight and secure environment for running containers, while Systemd takes over their lifecycle management, transforming containers into full-fledged system services. The key tool here is the podman generate systemd command, which automatically creates a Systemd unit file for a running container or pod.
This unit file can then be used to start, stop, restart the container, ensure its autostart upon system boot, configure dependencies with other services (e.g., a database), manage resources, and collect logs. This allows containers to be managed exactly like any other system service, which significantly simplifies administration and increases reliability. For example, you can configure a web server in a container to start only after a database in another container (or even on the host) is ready.
Thus, Podman and Systemd together offer a powerful, secure, and efficient solution for containerization on a VPS, allowing you to gain many of the benefits of Kubernetes (lifecycle management, isolation) without its complexity and resource intensity.
Practical Tips and Recommendations: Deployment with Podman and Systemd
 Diagram: Practical Tips and Recommendations: Deployment with Podman and Systemd
It's time to move from theory to practice. Here we will look at step-by-step instructions and real-world configuration examples for effectively using Podman and Systemd on your VPS.
1. Installing Podman
In 2026, Podman is available in the standard repositories of most popular Linux distributions. Make sure you are using an up-to-date version.
# For Debian/Ubuntu
sudo apt update
sudo apt install -y podman

# For CentOS/RHEL/Fedora
sudo dnf install -y podman

# Check installation
podman --version
If you plan to use rootless containers (which is highly recommended), ensure your user has a sufficient UID/GID range to create user namespaces. This is usually configured automatically during Podman installation, but sometimes manual configuration of /etc/subuid and /etc/subgid may be required.
# Example /etc/subuid for user user1
user1:100000:65536

# Example /etc/subgid for user user1
user1:100000:65536
This means that user user1 can use UID/GID from 100000 to 165535 inside their rootless containers.
2. Running a simple container (rootless)
Let's start with a simple Nginx server, running as an unprivileged user.
# Log in as your regular user (not root)
podman run --name my-nginx -p 8080:80 -d nginx:latest

# Check container status
podman ps

# Check logs
podman logs my-nginx
Now your Nginx is available at http://localhost:8080 on the VPS. If you want to make it accessible from outside, ensure your firewall allows traffic on port 8080.
3. Generating a Systemd Unit File for a Container
Podman's most powerful feature for Systemd integration is automatic unit file generation. For rootless containers, unit files should be located in the ~/.config/systemd/user/ directory.
# Stop the running container so Systemd can manage it
podman stop my-nginx
podman rm my-nginx

# Generate a Systemd unit file for a rootless container.
# --name: service name
# --files: create a .service file
# --new: create a new container if it doesn't exist (on restart)
# --restart-policy: restart policy
# --container-prefix: prefix for the container name
podman generate systemd --name my-nginx --files --new --restart-policy=always \
  --container-prefix container-my-nginx-service -f ~/.config/systemd/user/my-nginx.service
Open the generated file ~/.config/systemd/user/my-nginx.service. It will look something like this:
# ~/.config/systemd/user/my-nginx.service
# Automatically generated by Podman.
# Do not edit this file manually, as it will be overwritten.
# Use 'podman generate systemd --help' for more information.
[Unit]
Description=Podman container-my-nginx-service.service
Documentation=man:podman-generate-systemd(1)
Wants=network-online.target
After=network-online.target
RequiresMountsFor=%t/containers

[Service]
Environment=PODMAN_SYSTEMD_UNIT=%n
Restart=on-failure
TimeoutStopSec=70
ExecStartPre=/bin/rm -f %t/%n.cid
ExecStart=/usr/bin/podman run --conmon-pidfile %t/%n.cid --cidfile %t/%n.cid --cgroups=no-conmon --sdnotify=conmon -d --replace \
  --name container-my-nginx-service -p 8080:80 nginx:latest
ExecStop=/usr/bin/podman stop --ignore --cidfile %t/%n.cid
ExecStopPost=/usr/bin/podman rm --ignore --cidfile %t/%n.cid
Type=notify
NotifyAccess=all

[Install]
WantedBy=default.target
Note ExecStart, where Podman starts the container. Restart=on-failure ensures automatic restarts. WantedBy=default.target means the service will start when the user's Systemd session starts.
4. Managing the Container via Systemd (rootless)
Now we can manage the container as a regular user Systemd service.
# Reload Systemd configuration for user units
systemctl --user daemon-reload

# Enable service autostart on user login
systemctl --user enable my-nginx.service

# Start the service
systemctl --user start my-nginx.service

# Check status
systemctl --user status my-nginx.service

# View logs
journalctl --user -u my-nginx.service

# Stop the service
systemctl --user stop my-nginx.service

# Disable autostart
systemctl --user disable my-nginx.service
Important: For rootless containers managed by Systemd, by default the service only starts after the user logs in. To make it run after a VPS reboot without manual login, use loginctl enable-linger . This allows user Systemd services to run in the background, even if the user is not logged in.
# Enable linger for your user
sudo loginctl enable-linger $(whoami)

# Check that linger is enabled
loginctl show-user $(whoami) | grep Linger
5. Deploying a Pod with Multiple Containers and Systemd
Suppose you have a web application (Python/Node.js) and a database (PostgreSQL) that need to work together. Podman can combine them into a "pod".
# Create a pod
podman pod create --name my-app-pod -p 80:80

# Run PostgreSQL in the pod
podman run --pod my-app-pod --name my-db -e POSTGRES_PASSWORD=mysecretpassword -d postgres:16

# Run your web application (assuming it has an image app:latest)
# The application will be available on host port 80
podman run --pod my-app-pod --name my-web -d my-app:latest

# Check pod and containers
podman pod ps
podman ps
Now let's generate a Systemd unit file for the entire pod:
# Stop the pod so Systemd takes control
podman pod stop my-app-pod
podman pod rm my-app-pod

# Generate a unit file for the pod
podman generate systemd --name my-app-pod --files --new --restart-policy=always \
  --container-prefix pod-my-app-service -f ~/.config/systemd/user/my-app-pod.service
The my-app-pod.service file will contain instructions for starting all containers in the pod. Then use systemctl --user daemon-reload, enable, start, status, journalctl, as shown above.
6. Fine-tuning Systemd Unit Files
While podman generate systemd creates a good basic file, it often needs refinement. You can manually edit the .service file (but remember that podman generate will overwrite it, so it's better to do this in a copy or modify the generated file). For example, you can add:
Wants=db.service: If your application needs a local database managed by another Systemd unit file.Requires=network-online.target: Ensure the network is available before startup.LimitCPU=, MemoryLimit=: Resource limits at the Systemd level (in addition to cgroups in Podman).User=: If running as root, you can specify a particular user.WorkingDirectory=: Specify the working directory.Environment="VAR=VALUE": Add environment variables.
Example modification of my-app-pod.service for greater reliability and security:
# ~/.config/systemd/user/my-app-pod.service
# ... (remaining part of the file, generated by Podman) ...

[Service]
# ... (existing parameters) ...

# Additional settings for security and stability
# Restrict file system access (read-only, except for allowed paths)
ProtectSystem=full
ProtectHome=read-only

# Restrict network access (allow only IPv4/IPv6, no RAW sockets)
RestrictAddressFamilies=AF_INET AF_INET6

# Set resource limits
MemoryMax=1G
CPUQuota=50% # Limit CPU to 50% of one core

# Environment variables for the application, if needed in Systemd
Environment="APP_ENV=production"
Environment="DATABASE_HOST=localhost" # If DB is in the same pod

# Ensure containers start after all file systems are mounted
Requires=local-fs.target
After=local-fs.target

[Install]
WantedBy=default.target
After any manual changes, don't forget systemctl --user daemon-reload and systemctl --user restart my-app-pod.service.
7. Using Volume Mounts and Persistency
To preserve container data (databases, uploaded files), use Podman named volumes or host directory mounts. Podman automatically accounts for these volumes when generating Systemd unit files.
# Create a named volume
podman volume create my-db-data

# Run PostgreSQL using the volume
podman run --name my-db-persistent \
  -v my-db-data:/var/lib/postgresql/data \
  -e POSTGRES_PASSWORD=mysecretpassword -d postgres:16

# Generate Systemd unit
podman generate systemd --name my-db-persistent --files --new --restart-policy=always \
  -f ~/.config/systemd/user/my-db-persistent.service
The generated file will specify the -v my-db-data:/var/lib/postgresql/data parameter, ensuring data persistence.
These practical tips will help you quickly and efficiently deploy and manage containers on your VPS, leveraging the power of Podman and Systemd.
Common Mistakes When Working with Podman and Systemd
 Diagram: Common Mistakes When Working with Podman and Systemd
Even the most experienced engineers can encounter problems when learning new tools. Here is a list of common mistakes when working with Podman and Systemd, and how to avoid them.
1. Forgetting loginctl enable-linger for rootless services
Mistake: You've configured a rootless container, generated a Systemd unit file, enabled it with systemctl --user enable, but after a VPS reboot, the container doesn't start until you log in as your user.
Why it happens: User Systemd services by default only start when there is an active user session. When you log out or restart the server, the session ends, and the services stop.
How to avoid: Use the command sudo loginctl enable-linger . This allows user Systemd services to run in the background, even if the user is not logged in. After this, don't forget systemctl --user daemon-reload and systemctl --user restart .
# Example consequence: after VPS reboot, container is not running
systemctl --user status my-nginx.service
# Output: inactive (dead)

# Solution
sudo loginctl enable-linger $(whoami)
systemctl --user daemon-reload
systemctl --user enable my-nginx.service
systemctl --user start my-nginx.service
2. Network access issues for rootless containers
Mistake: The container is running rootless but cannot access external resources or cannot be accessed from outside, even if the port is forwarded.
Why it happens: Rootless containers use User-mode networking (e.g., slirp4netns), which may have limitations or require additional firewall configuration. Ports below 1024 usually require privileges.
How to avoid:
- Use ports above 1024 for publishing, if possible (e.g., 8080 instead of 80).
- Ensure that
firewalld or ufw on the host allow traffic to the forwarded ports. For slirp4netns, traffic might go through the slirp4netns or lo interface.
- Check that
ip_unprivileged_port_start in sysctl is not interfering (though for rootless this is less relevant, it's good to know).
- For more complex network configurations, consider using CNI plugins configured for rootless mode (e.g.,
netavark/aardvark-dns), although this complicates setup. For most VPS, slirp4netns is sufficient.
# Example firewall check (for firewalld)
sudo firewall-cmd --list-all
sudo firewall-cmd --zone=public --add-port=8080/tcp --permanent
sudo firewall-cmd --reload
3. Incorrect use of --new and --replace when generating Systemd unit files
Mistake: After changing the podman run command or image, the Systemd service doesn't update, or Podman complains that the container already exists.
Why it happens: podman generate systemd by default creates a unit file for an existing container. If you want Systemd to always launch a new container or update it, you need to use options.
How to avoid:
- Use
--new: This option tells Systemd to launch the container using the podman run command, not podman start. This ensures that the container will be created (or updated) with the latest parameters.
- Use
--replace: Inside ExecStart (if you are using --new), add --replace to the podman run command. This will allow Podman to remove the old container with the same name and create a new one if it already exists.
# Correct generation for automatic update/recreation
podman generate systemd --name my-app --files --new --restart-policy=always \
  --container-prefix container-my-app-service -f ~/.config/systemd/user/my-app.service

# Make sure --replace is in ExecStart:
# ExecStart=/usr/bin/podman run --replace ...
4. Incorrect volume management and data persistence
Mistake: Database data or user files are lost when the container is deleted/updated.
Why it happens: Containers are inherently ephemeral. If data is stored inside the container's file system, it will be lost when the container is deleted.
How to avoid:
- Use named Podman volumes (
podman volume create). They are managed by Podman and exist independently of containers.
- Mount host directories (bind mounts) using
-v /path/on/host:/path/in/container. Ensure that the rootless container user has the necessary permissions for this directory on the host.
- Always explicitly specify volumes when launching a container with persistent data.
# Creating a volume
podman volume create my-db-data

# Running a container with a volume
podman run --name my-db -v my-db-data:/var/lib/postgresql/data ...
5. Ignoring Systemd logs and status
Mistake: The container doesn't start, but you don't know why, and you start "poking" commands randomly.
Why it happens: Insufficient use of the powerful diagnostic tools provided by Systemd.
How to avoid: Always start debugging by checking the Systemd service status and its logs.
# Check overall service status
systemctl --user status my-app-pod.service

# View detailed service logs
journalctl --user -u my-app-pod.service

# View the last N lines of container logs directly
podman logs my-app-container-name
Often the problem lies in configuration errors inside the container or incorrectly passed environment variables, which is easy to see in the logs.
6. Running Systemd services as root when rootless is possible
Mistake: All containers are run as root, which increases the attack surface.
Why it happens: Habit of working with Docker, which by default runs containers as root, or unawareness of Podman's rootless mode capabilities.
How to avoid: Always try to run containers in rootless mode. To do this:
- Create Systemd unit files in
~/.config/systemd/user/.
- Manage them using
systemctl --user.
- Enable linger for your user (see mistake 1).
If you truly need a rootful container (e.g., for specific network operations), then the unit file should be in /etc/systemd/system/, and you will manage it via sudo systemctl.
7. Forgetting about podman system prune
Mistake: VPS disk space gradually runs out due to a large number of unused images, containers, and volumes.
Why it happens: During development and deployment, temporary images, stopped containers, and unused volumes are created, which take up space.
How to avoid: Regularly run podman system prune (or its more specific versions podman image prune, podman container prune, podman volume prune) to clean up unused resources.
# View disk usage
podman system df

# Clean up all unused containers, images, volumes, and cache
podman system prune -a
You can add this command to a cron job or Systemd timer so that it runs automatically, for example, once a week.
By avoiding these common mistakes, you can significantly improve the stability, security, and efficiency of your container infrastructure on a VPS using Podman and Systemd.
Checklist for Practical Application
This checklist will help you step-by-step deploy your application using Podman and Systemd on a VPS. Follow it to ensure the reliability and security of your infrastructure.
VPS and User Preparation
- VPS Selection and Configuration:
- Choose a VPS with sufficient RAM (minimum 1GB for OS + 512MB per container) and CPU (1-2 cores).
- Install a fresh Linux distribution (Ubuntu Server 24.04+, CentOS Stream 9+, Debian 12+).
- Creating an Unprivileged User:
- Create a new user for running rootless containers (e.g.,
appuser).
- Grant them sudo privileges (or configure
sudoers to execute only necessary commands, if required by security policy).
- Installing Podman and Necessary Packages:
- Execute
sudo apt install -y podman (for Debian/Ubuntu) or sudo dnf install -y podman (for RHEL/CentOS).
- Ensure that
slirp4netns and fuse-overlayfs are installed for rootless mode.
- Configuring
subuid and subgid:
- Ensure that
/etc/subuid and /etc/subgid contain entries for your user (Podman usually does this during installation). For example: appuser:100000:65536.
- Enabling Systemd Linger for the User:
- Log in as
appuser and execute sudo loginctl enable-linger $(whoami) so that user Systemd services continue to run after reboot.
- Firewall Configuration:
- Allow incoming traffic on the ports your applications will use (e.g., 80, 443, 8080). Use
ufw or firewalld.
Image Development and Building
- Dockerfile Preparation:
- Ensure your
Dockerfile is optimized (multi-layer, minimal base image, cache cleanup).
- Use
COPY --chown=appuser:appuser for files so they belong to the unprivileged user inside the container.
- Building the Image with Podman:
- Use
podman build -t my-app:latest . to build the image.
- Verify that the image was successfully created:
podman images.
- Publishing the Image (optional):
- If you are using a private registry, log in to it:
podman login registry.example.com.
- Push the image:
podman push my-app:latest registry.example.com/my-app:latest.
Deployment on VPS
- Uploading the Image to VPS:
- If not using a registry, transfer the image to the VPS (e.g., via
scp or podman save/load).
- Or download from the registry:
podman pull registry.example.com/my-app:latest.
- Creating a Podman Container or Pod:
- For a single container:
podman run --name my-app -p 8080:80 -d my-app:latest.
- For multiple containers in a pod:
podman pod create --name my-app-pod -p 80:80, then podman run --pod my-app-pod ... for each container.
- Always use named volumes for data persistence:
podman volume create my-data and -v my-data:/path/in/container.
- Generating a Systemd Unit File:
- Stop the container/pod:
podman stop my-app; podman rm my-app.
- Generate the unit file:
podman generate systemd --name my-app --files --new --restart-policy=always -f ~/.config/systemd/user/my-app.service.
- For a pod:
podman generate systemd --name my-app-pod --files --new --restart-policy=always -f ~/.config/systemd/user/my-app-pod.service.
- Configuring and Enabling the Systemd Service:
- Execute
systemctl --user daemon-reload.
- Enable autostart:
systemctl --user enable my-app.service (or my-app-pod.service).
- Start the service:
systemctl --user start my-app.service.
- Checking Status and Logs:
- Ensure the service is running:
systemctl --user status my-app.service.
- View logs:
journalctl --user -u my-app.service.
- Check application accessibility via browser or
curl.
Support and Maintenance
- Configuring Automatic Cleanup:
- Create a Systemd timer to regularly run
podman system prune -a (e.g., once a week) to prevent disk filling.
- Monitoring:
- Set up basic VPS monitoring (CPU, RAM, Disk I/O) and application logging.
- Use
journalctl for log aggregation.
- Application Update:
- Build a new image.
- Transfer/push it.
- Stop the Systemd service:
systemctl --user stop my-app.service.
- Update the container (if you used
--new --replace, then simply systemctl --user start my-app.service). Otherwise, podman rm my-app might be required before starting.
- Start:
systemctl --user start my-app.service.
- Backup:
- Configure regular backups of Podman persistent volumes or mounted directories.
By following this checklist, you will be able to confidently and securely deploy and maintain your applications on a VPS, leveraging the power of Podman and Systemd.
To better illustrate the practical value of the Podman and Systemd combination, let's consider several realistic real-world scenarios.
FAQ (Frequently Asked Questions)
What is Podman and how does it differ from Docker?
Podman is an OCI-compliant container manager designed as a direct replacement for Docker. The main difference is that Podman operates daemonless, which enhances security and reduces resource consumption. Podman containers run as regular user processes, not as child processes of a central daemon. Podman also natively supports rootless containers, allowing them to be run as an unprivileged user.
Why is Systemd important for container orchestration with Podman?
Systemd is the standard service manager in most modern Linux distributions. It allows managing the lifecycle of containers just like any other system service. This includes automatic startup at system boot, restarts on failures, dependency management, logging via journalctl, and fine-grained resource and security configuration. Systemd ensures reliable and predictable integration of containers into the operating system.
Can Podman and Systemd be used for production projects?
Yes, absolutely. Podman and Systemd are mature and stable technologies. Many large companies and projects use this combination in production, especially where resource efficiency, security, and ease of management on individual servers or small clusters are important. Red Hat actively supports Podman and uses it in its products.
Can I use existing Dockerfiles and Docker images with Podman?
Yes, Podman is fully compatible with Dockerfiles and Docker images. You can use the same Dockerfiles to build images with podman build and run existing images from Docker Hub or private registries using podman run. This makes migrating from Docker to Podman very straightforward.
How to ensure data persistence for Podman containers?
To preserve data, use Podman named volumes (podman volume create) or bind mounts of host directories using the -v option. These volumes will exist independently of the container's lifecycle and will ensure the preservation of your data even when the container is deleted or updated.
How to manage rootless containers after a VPS reboot?
For rootless containers managed by Systemd, you need to enable "linger" mode for your user using the command sudo loginctl enable-linger . This will allow user Systemd services to start and run in the background even without an active user session after a system reboot.
Do I need podman-compose if I use Systemd?
podman-compose is useful for local development and testing, as it allows using familiar docker-compose.yml files. However, for production deployment on a VPS, it is preferable to use podman generate systemd. This command creates full-fledged Systemd unit files that provide more reliable OS integration, automatic restarts, and lifecycle management, which is critically important for a production environment.
How to update containers and applications with Podman + Systemd?
The update process involves building a new image (podman build), transferring it to the VPS (podman push/pull or scp), then stopping the Systemd service (systemctl --user stop), possibly removing the old container (podman rm), and finally starting the service, which will create a new container from the updated image (systemctl --user start). If you used --new --replace when generating the Systemd unit file, a simple systemctl --user restart is sufficient.
Can Podman and Systemd be used for orchestrating multiple VPS?
Podman and Systemd themselves do not provide cluster features for orchestrating multiple VPS. They work perfectly on a single host. To manage containers on multiple VPS, you will need an external tool such as Ansible or Terraform, which will automate the deployment and management of Systemd unit files on each server.
What are the main advantages of Podman + Systemd compared to Kubernetes?
The main advantages are simplicity, resource efficiency, and low cost. Kubernetes, even in lightweight versions like K3s, has significant overhead and requires much more resources and management complexity. Podman + Systemd is ideal for projects that do not need a full-featured Kubernetes cluster but want to leverage the benefits of containerization on one or more VPS.
What tools should be used for monitoring Podman containers?
For monitoring, you can use podman stats to view current resource consumption by containers. For system monitoring, journalctl for logs and htop/top for host resources are suitable. For more advanced monitoring, you can deploy lightweight Prometheus + Grafana in Podman containers or use Netdata on the host.